![]()

(or what the editor gets up to during winter hibernation)
|
|
|
|
|
(or what the editor gets up to during winter hibernation) |
||
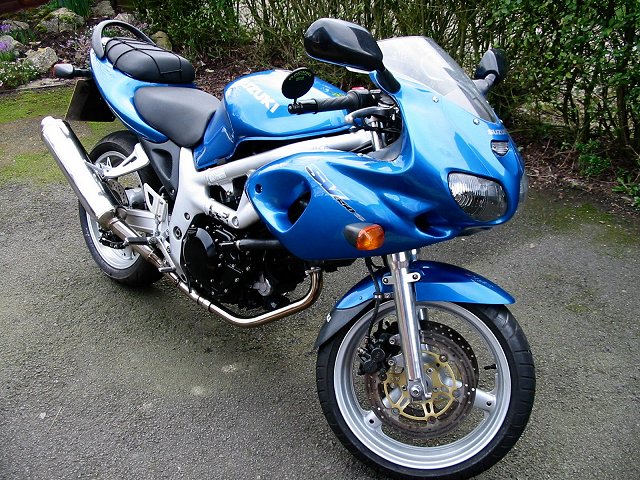
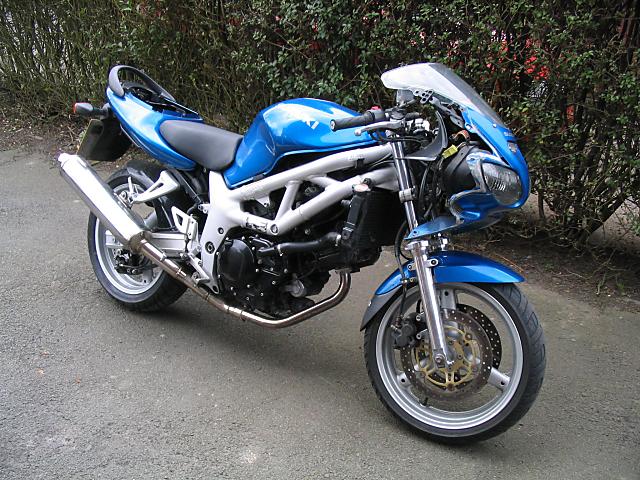
| This is a record of
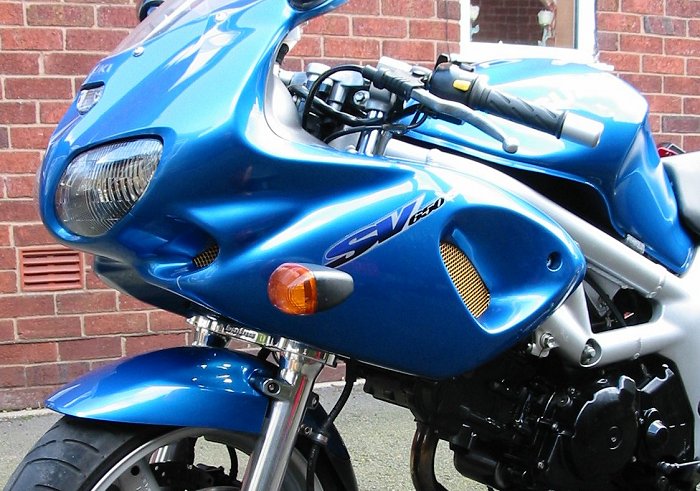
the work carried out on my original 1999 SV650S whilst in my ownership. This bike was purchased in December 99 and
has now covered 24K miles. I use it daily for work in all sorts of
weather (apart from Jan and Feb). Contrary to the evidence below I do clean it
regularly.
|
|
|
First weekend 19th Jan 2002 |
Click image for a scarier view |
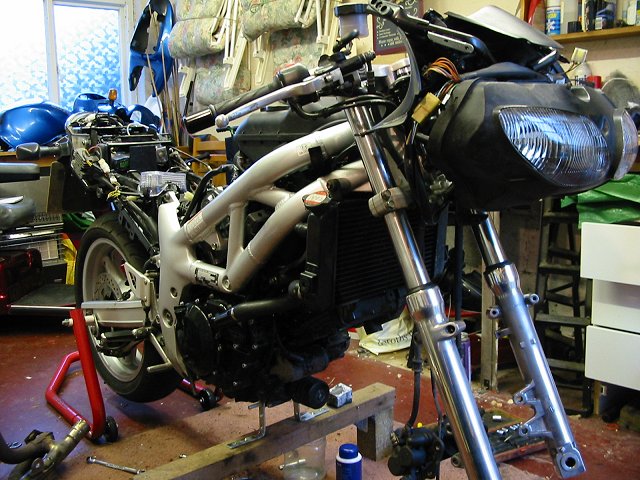
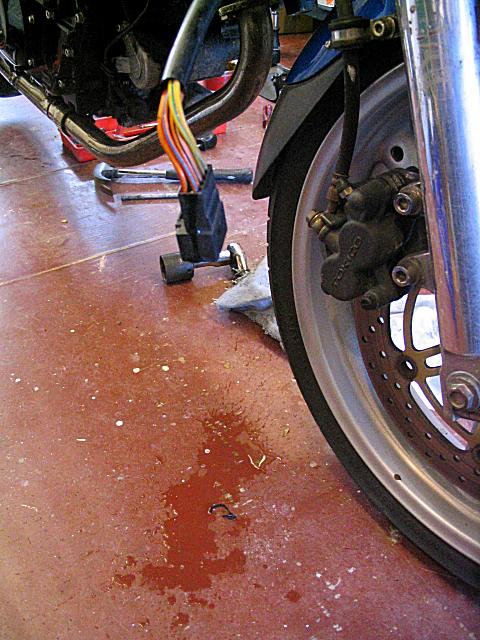
| First job , strip off all the plastic and see what's lurking underneath. Not too bad so far. The electrical connectors inside the fairing were free of corrosion but one cable sheath was full of water, hence why it is dangling down in this pic. |
|
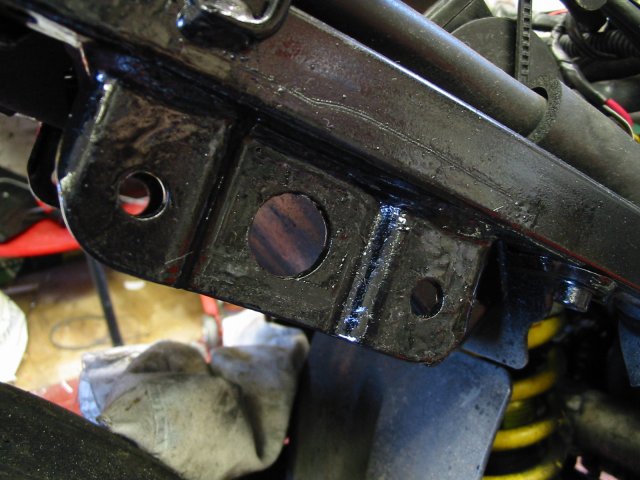
| A quick tour of the rusty bits. This is the left sub frame rail. The rest of the rail is okay, so I attacked it with a wire brush, covered it in Kurerust and then re-sprayed with smooth black Hammerite. This won't last forever and eventually I'll have to get the whole thing powder coated. |
|
| And this is the right |
|
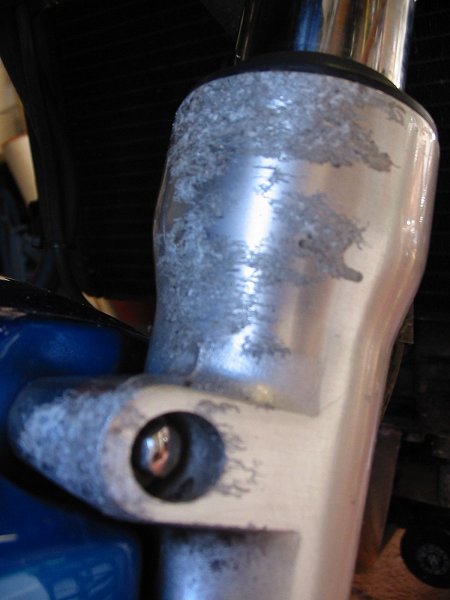
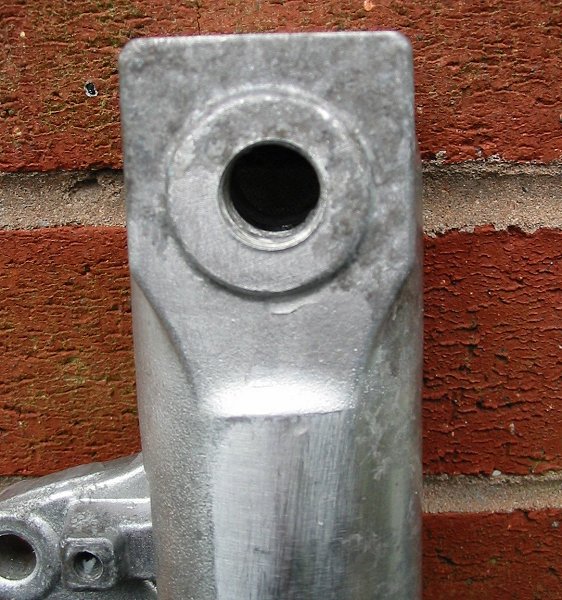
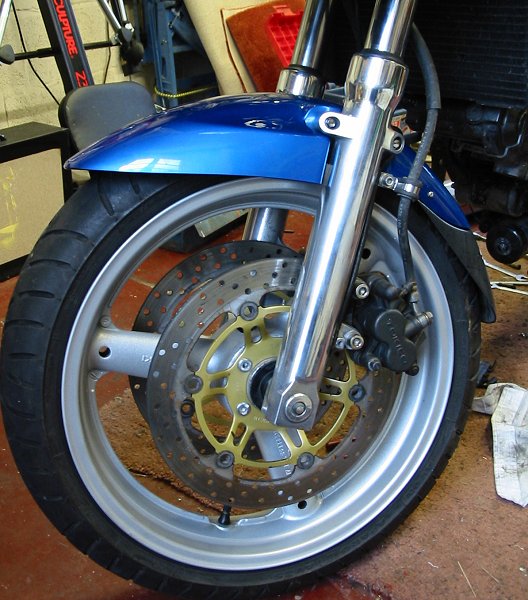
| Front left fork leg, looks like an acid attack, lots of bubbling lacquer. |
|
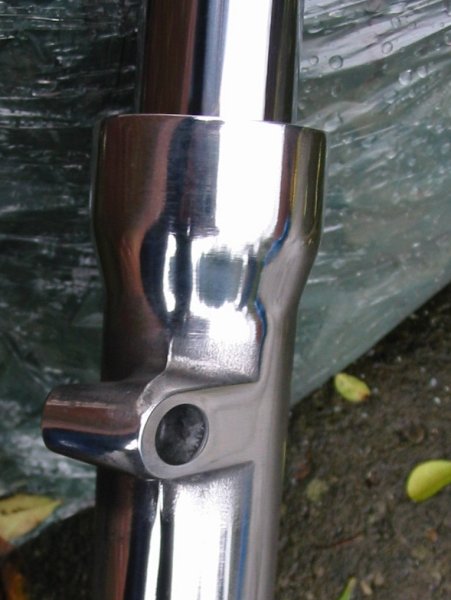
| Top of the left fork leg |
|
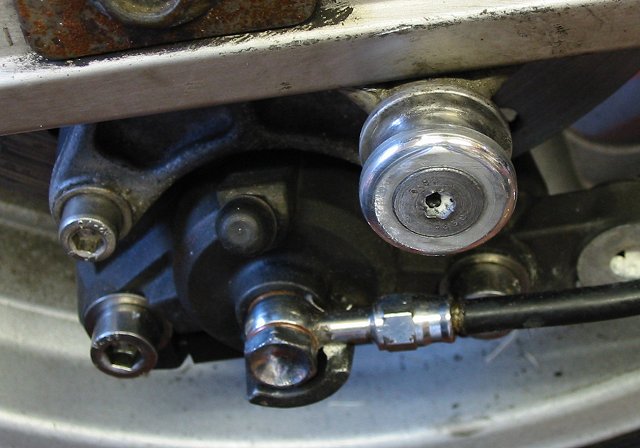
| Front brake banjos. At some point in the future I'll replace the brake pipes and bleed valves with stainless items, as I have the rear. |
|
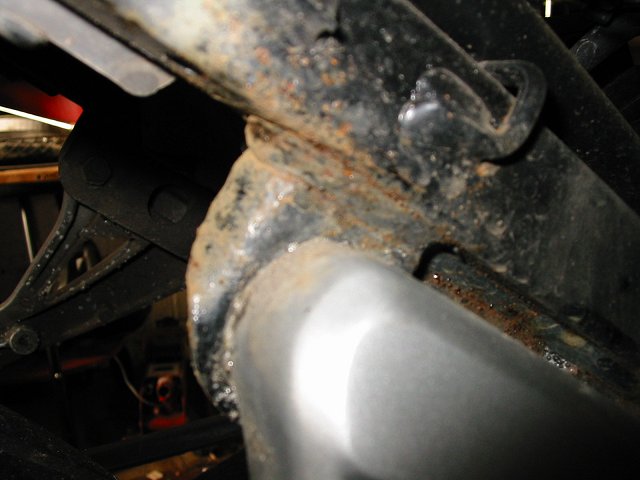
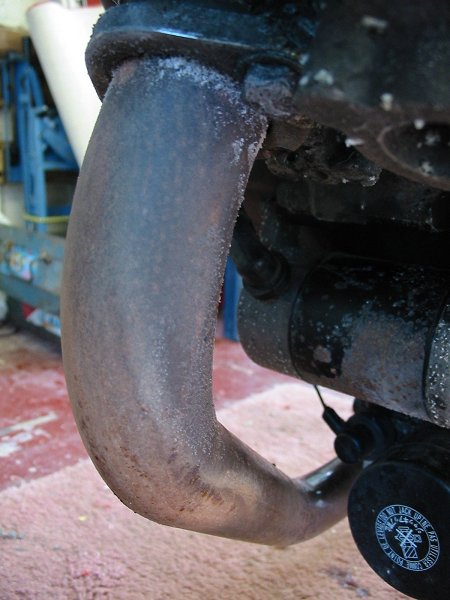
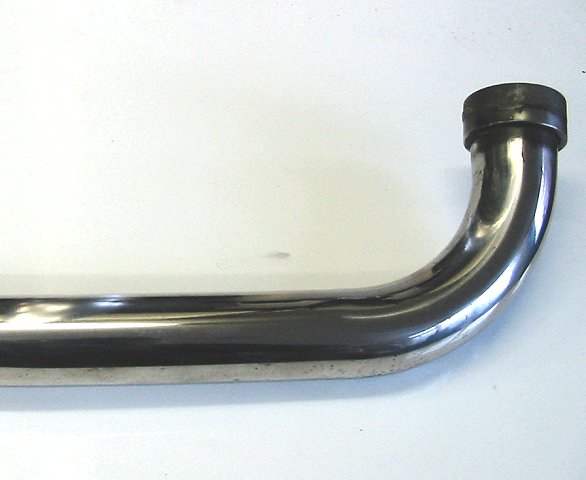
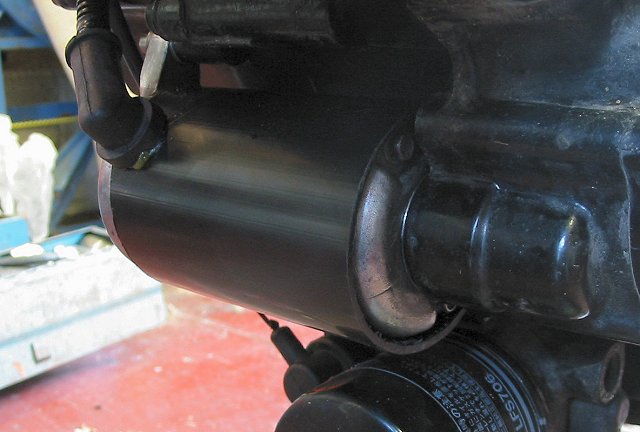
| Front exhaust pipe, not rusty as such but a nice shade of brown |
|
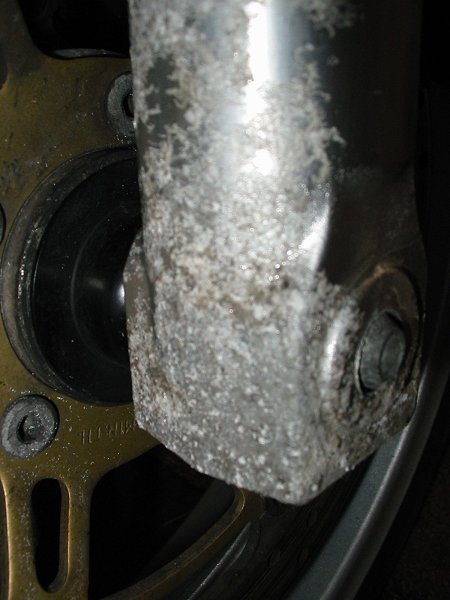
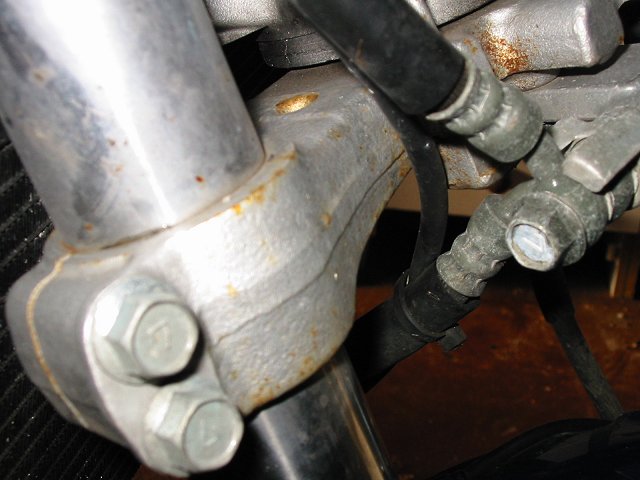
| Right hand side of the triple clamp (lower yolk) slight rust |
|
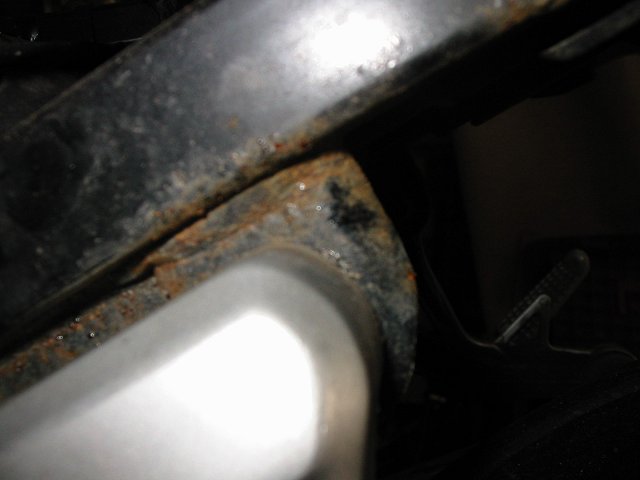
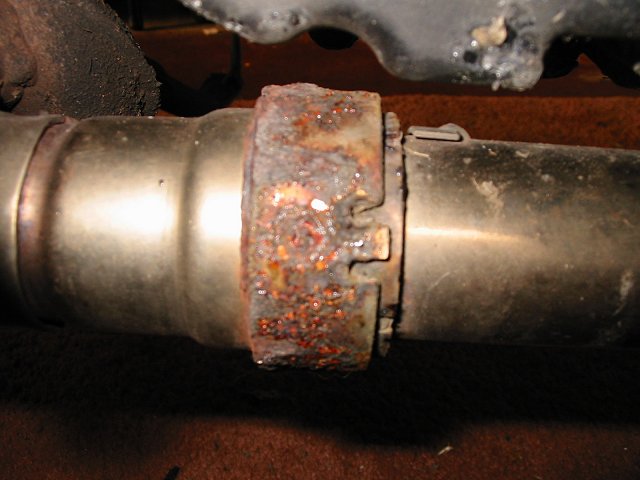
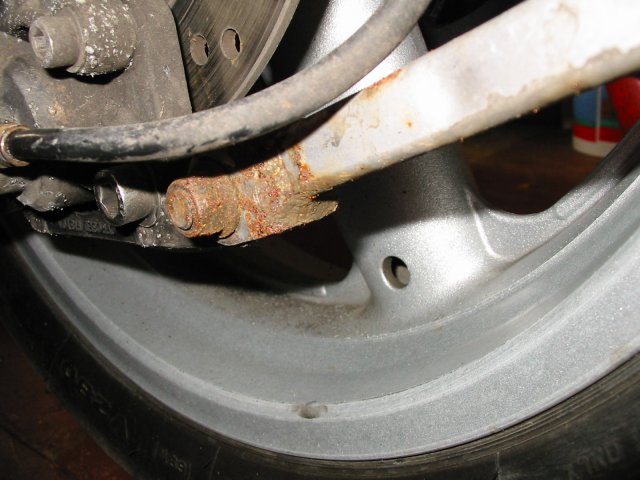
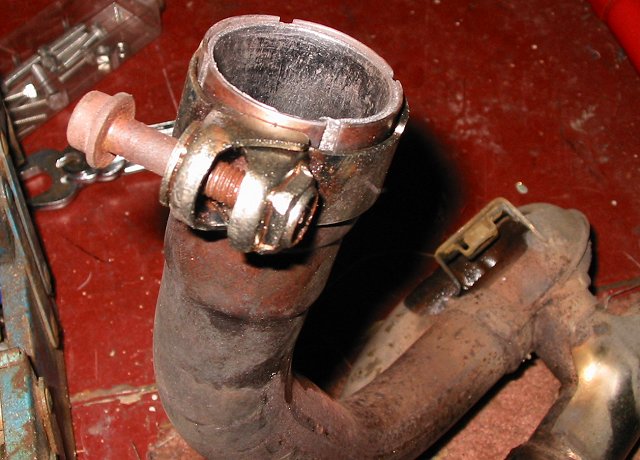
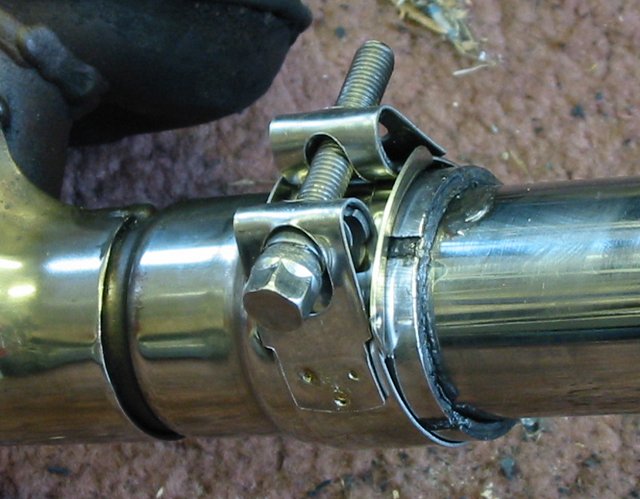
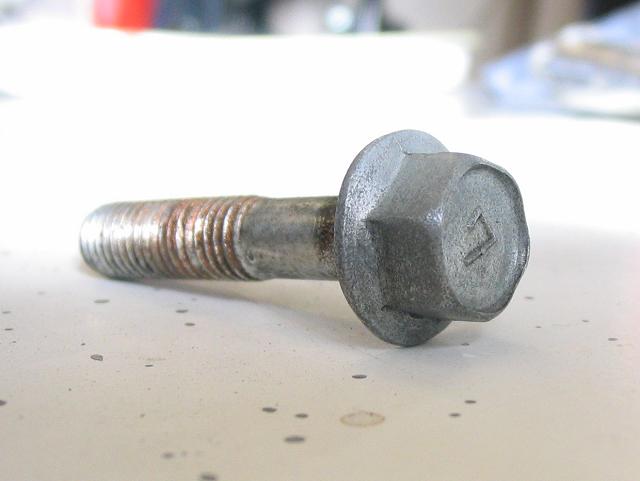
| Front exhaust clamp, I can't clean this up. I shall have to replace this with a stainless item. Looks like its been dragged out of a canal. Another cost cutting exercise by Suzuki. |
|
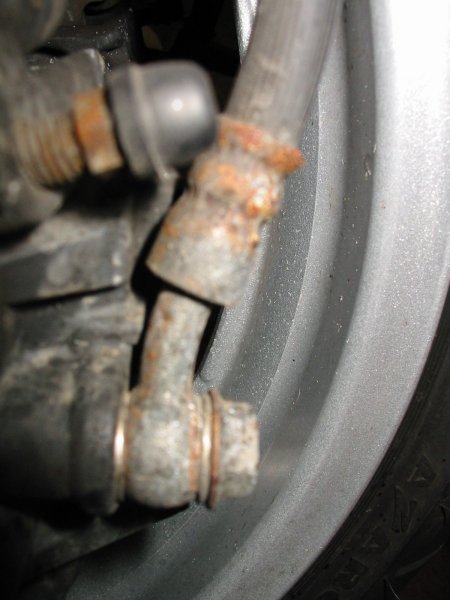
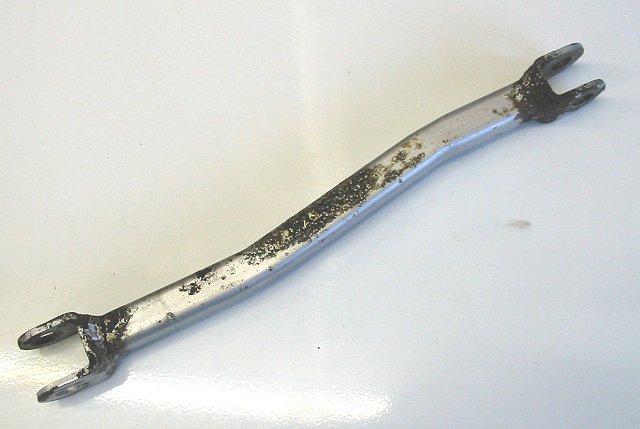
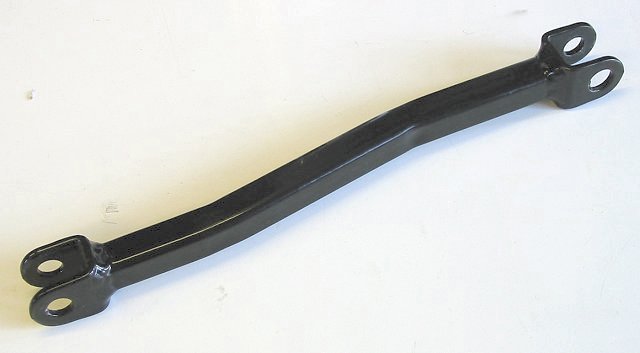
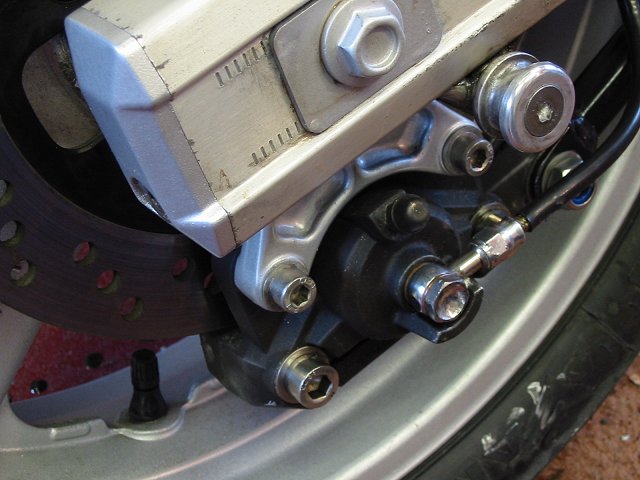
| Rear torque arm. I shall get this powder coated. I could re-spray it but it would just rust again in a couple of months in this vulnerable position. I shall replace the bolts with stainless items. |
|
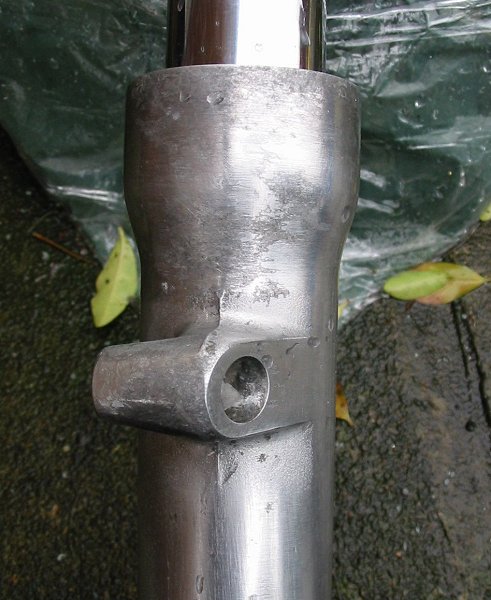
| A quick attack with paint stripper and wire wool got the lacquer off the forks but the staining is still present as you can see in this shot. |
|
| And this |
|
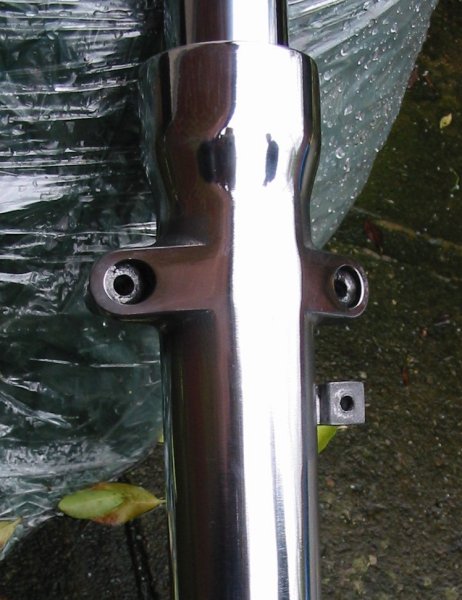
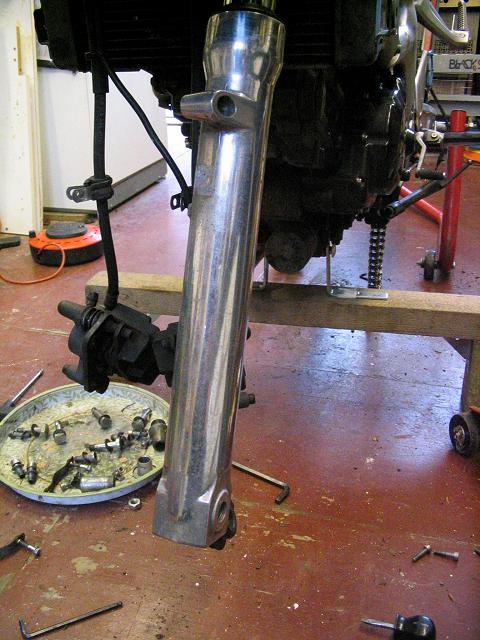
| After a good afternoon armed only with a polishing kit I managed to improve the fork legs to this |
|
| And this. It's not perfect but I'm not after perfection, just as long as it looks tidy. |
|
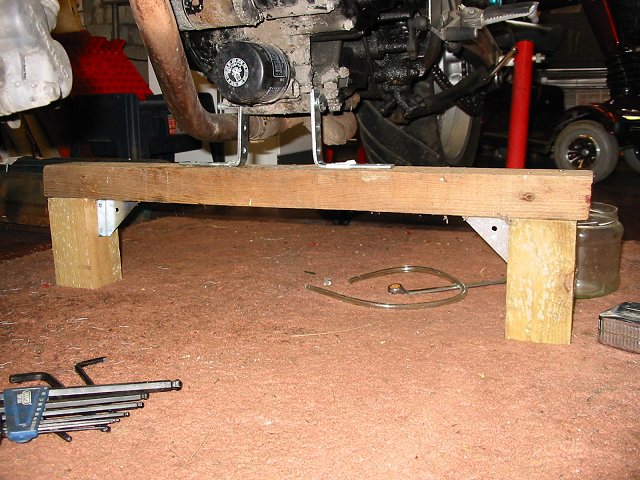
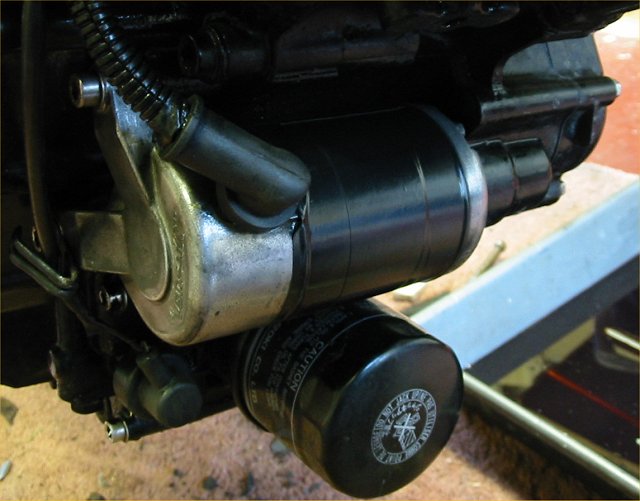
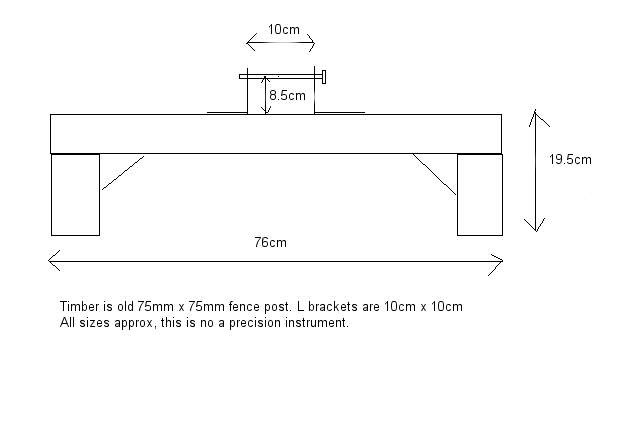
| In case you're interested. Here's what's holding the front of the bike off the floor. A home made stand using the unused engine mount hole behind the oil filter. Diagram here. Only cost a few quid to put together. |
|
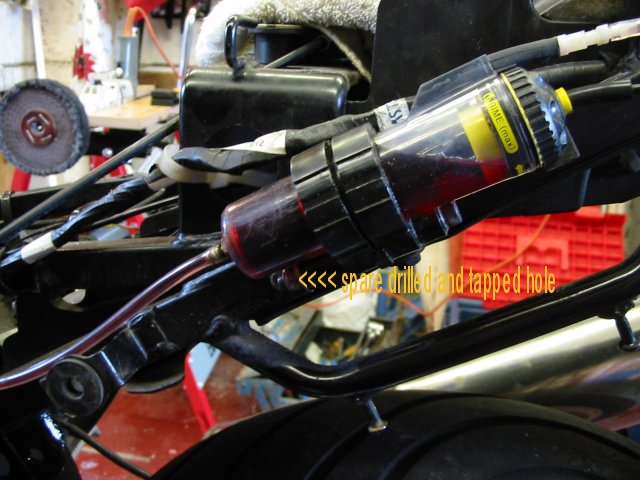
| And for those people looking for a Scottoiler location, here's were mine lives. There is a spare pre-threaded hole on the frame. It doesn't get in the way of the seat lock and I can easily adjust or top up by removing the rear seat. Also its not affected by the heat of the exhaust, unlike its previous position. |
|
|
Second weekend - 26/1/02 |
|
| I finished off the forks and reattached them to the bike. Replaced the oil with 490ml of Motul 15-20 fork oil. The amount of original fork oil was about 425ml. I added some pre-load spacers (16mm) made out of plastic pipe. | |
| Next job was to overhaul the front brake calipers. Due to large amounts of brake grease and Copperslip previously applied, this was a straight forward job. A good cleanup to remove old dirt and grease. Pistons were re-greased and the pin was re-coated in Copperslip. |
|
| Front wheel was then stripped down and thoroughly cleaned | |
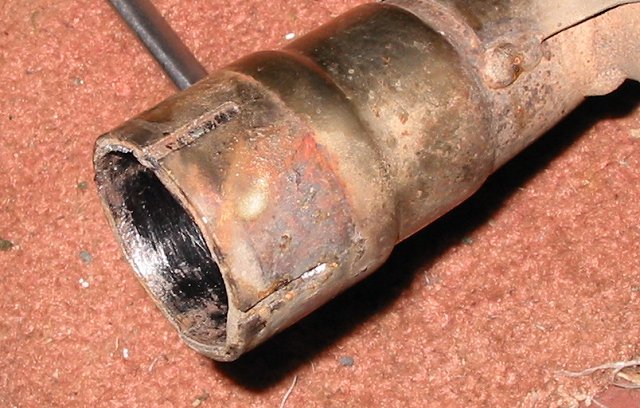
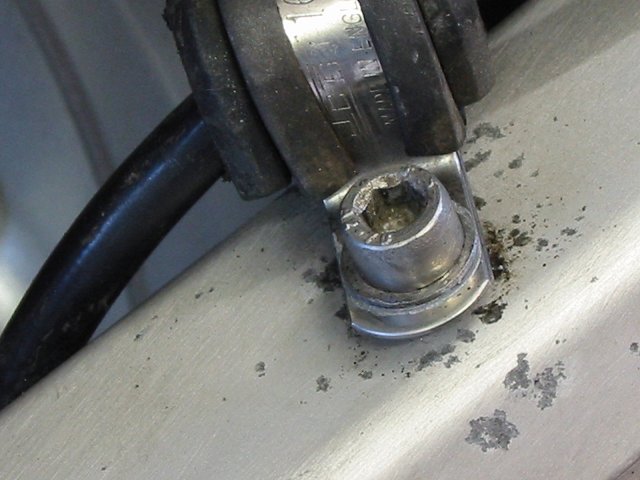
| Next job was to remove the header pipe for cleaning and polishing. This when I discovered that the clamp pictured above only went halfway around the pipe. The nut and bolt on the underside were missing completely. The reason that the whole clamp hadn't fallen off was because it was spot welded on (but not for long). I still couldn't remove the header pipe because it had to be pulled down to clear the cylinder and that made it impossible to pull away from the rest of the system. So I took the entire exhaust off! The clamp holding the rear pipe onto the cylinder is similar to the one underneath. Because it's not so exposed it has fared a lot better, but the bolt was still as rusty as hell. This was removed and replaced with a S/Steel item. |
|
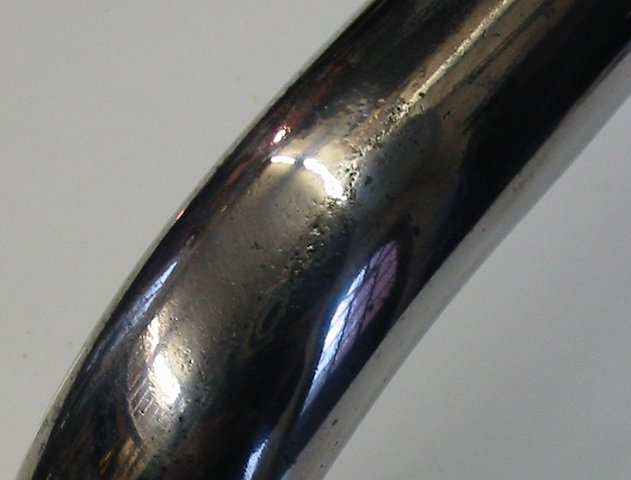
| Now to polish the header pipe. This was much tougher that the forks. There is extensive staining and pitting particularly on the section nearest the front wheel. |
|
| This is about as good as I could get the front pipe, bearing in mind that it will dis-colour the minute it's reattached due to heat, but still a damn site better than it was. It might be stainless steel, but it still corrodes so you need to stay on top of it. |
|
| As the exhaust was off it seemed an ideal time to take off the rear brake control arm. It was even rustier than I thought, the underside was very nasty. Now been stripped clean and is on it's way to a nearby powder coater. The colour will be to satin black because the contractor doesn't get much call for silver work and heating up his furnace for one small item will cost a fortune. Satin black is much more popular and he'll add my job to his next batch thus saving me some money. |
|
| This is the current state. Still lots to do. The engine needs a good clean whilst there is plenty of access to it. I want to tidy up the starter motor which is looking very scruffy, re-spraying doesn't last so a plastic sleeve of tape might look better and protect it from the front wheel. I also need to service the rear wheel and brake. |
|
|
Third weekend - 2/2/02 |
|
| Started off by rebuilding the front end. Once that was done I could get the bike off the fence stand and onto the side stand, this would give me better access to the starter motor. |
|
|
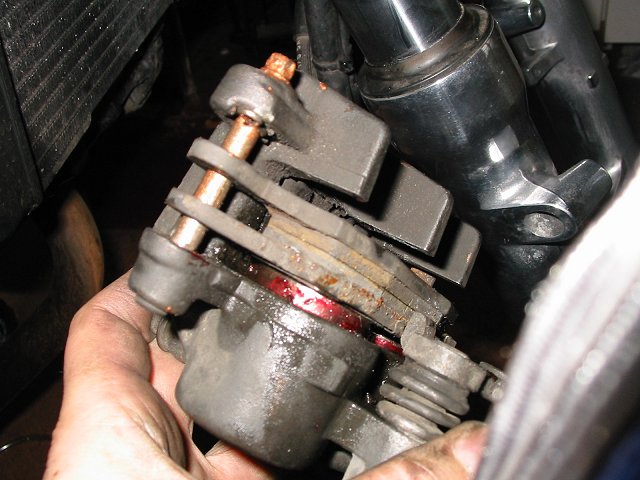
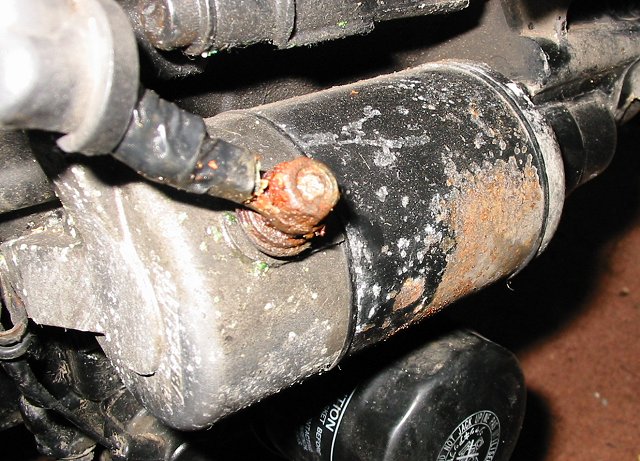
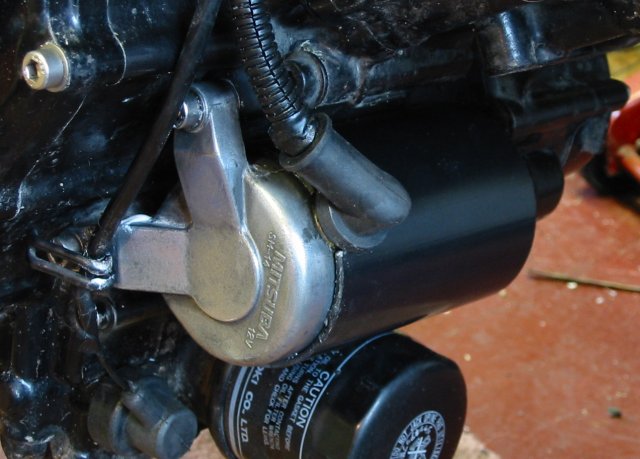
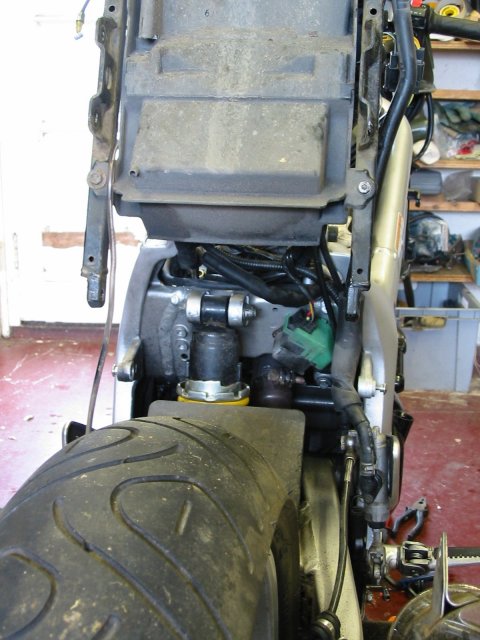
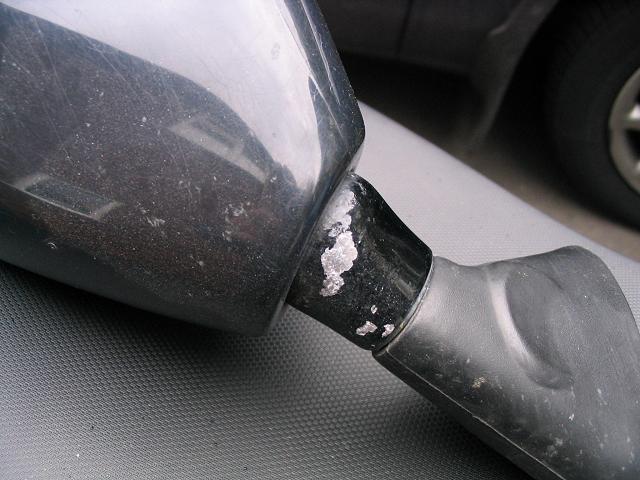
With the bike now leaning to the right I could get better access to the starter motor. This what I found when I removed the rubber boot to get at the electrical connections. ARGH! |
|
| A good clean up with a wire brush and the rust and old paint were removed. I have painted this motor once before when the original silver paint fell off and I used smooth black Hammerite. Even this cannot stand up to the abuse from the front wheel. A plastic sleeve of some sort would be the answer. The diameter of the motor is 62mm, so I'll be looking in the hardware store for something suitable in black. Meantime I've used electrical vinyl tape. |
|
|
I was a bit clumsy when I removed the starter
motor. I removed the electrical connection but didn't bother removing the
lead to the oil pressure switch below it. As I tugged and pulled at the
motor, I managed to rip the oil lead off..DOH! Also some engine oil
will leak out of the cavity occupied by the motor so have a drip tray
handy or something to bung the hole with. Anyhow I reattached the motor to
the bike and connected the lead. I also slapped a ton of grease on the
connection before pulling the rubber boot over it. The connections on the
oil pressure switch were also very rusty. I spent ages trying to re-attach
the spade terminal onto the end of the broken wire, of course I had no
spares. Again slapped grease all over this and replaced boot. Job done
until I find that plastic tube.
I can't understand why the designers didn't put some kind of cover over this lot or place them elsewhere. Anyone can see that these parts are going to get some rough treatment. |
|
| Next job clean up and paint bits of the sub-frame. A quick blitz with a wire brush in the Dremel soon got rid of the rust. A coat of Kurerust and the the smooth black Hammerite brought things back to a reasonable level. It isn't perfect, but most of this is hidden. Maybe a powder coat next year. |
|
| Some more polishing on the exhaust. God I'm bored with this. No new exhaust clamp yet, It's on order from Demon Tweak but of course they're out of stock. Mr Fast'ner also do them but I can't get through to them. |
|
| Time to look at the rear end. More disappointment but not Suzuki's fault this time. This is a Goodridge chrome plated replacement. I though in my naivety that chrome would stand up to the weather better that the original cadmium plate. Wrong, should have bought stainless steel. |
|
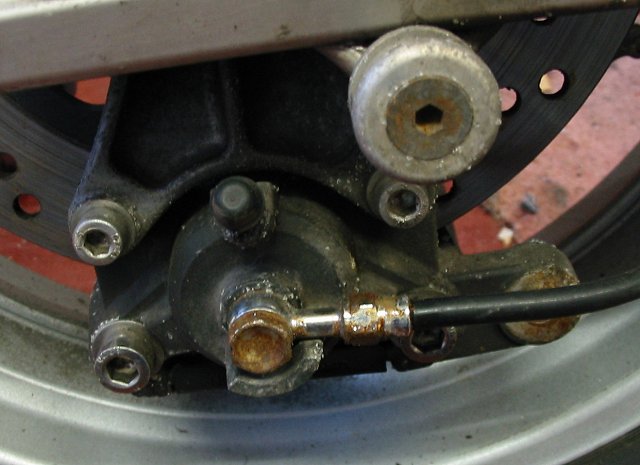
| Again thanks to copious amounts of grease and copperslip, the brake was easy enough to clean and service. I replaced the pads and there was only a couple of mm to go. I used the Dremel again to get the rust off the brake banjo and then cleaned with Solvo. I tried to remove the bobbin but its rusted fast. I must have put copperslip on this, or did I. Anyhow I could drill it out and re-tap the thread but why? I just cleaned it up as it stood. |
|
| I started replacing the the front bodywork next, just the middle section. The white stuff is silicone sealant used in bathrooms. I had some panel rattles and I hate that. I let the silicone dry and it acts as a rubber damper. Don't re-assemble when wet, I did that once and had a hell of a job getting the panels apart. |
|
|
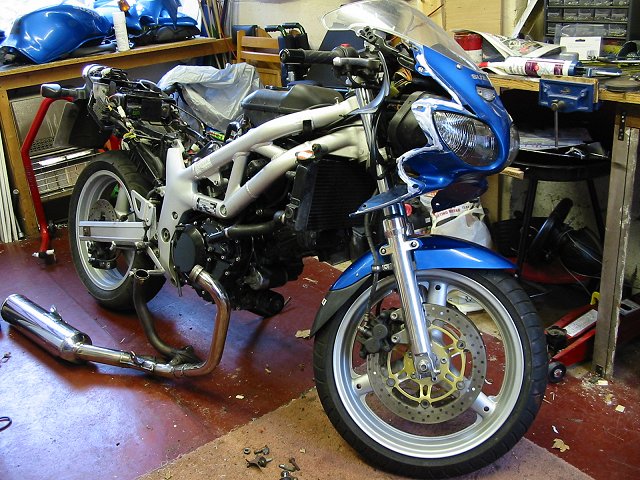
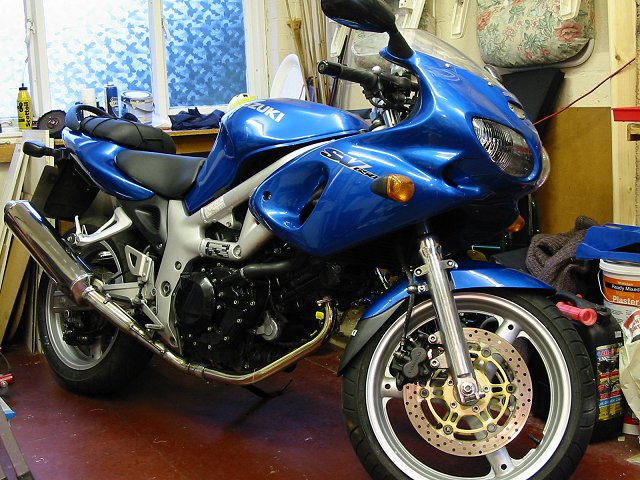
This is the current state of play, not much more to do. |
|
|
Last weekend - 9/2/02 |
|
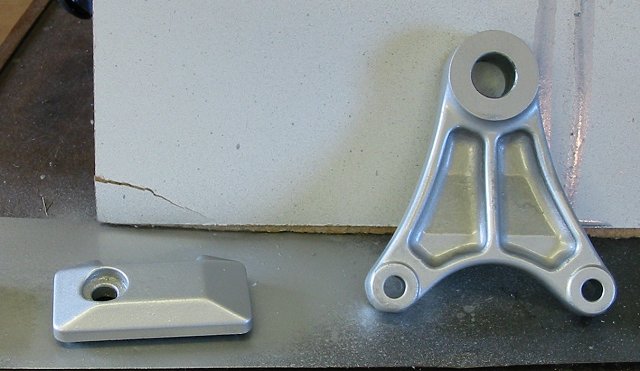
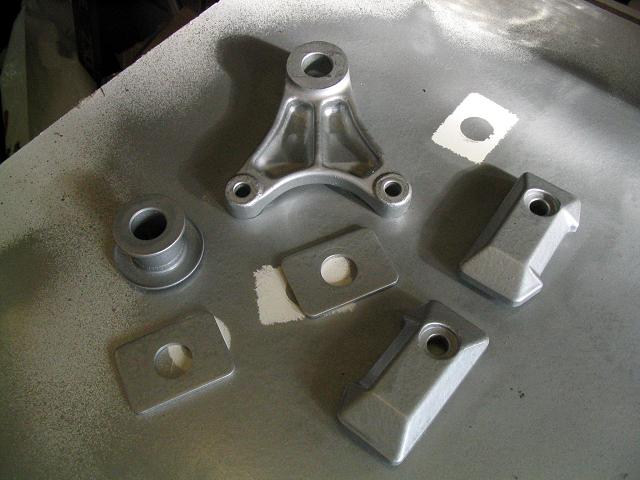
| The brake torque arm is back from the powder coater. It looks more like gloss black to me, still he only charged me a tenner, and it does look nice. |
|
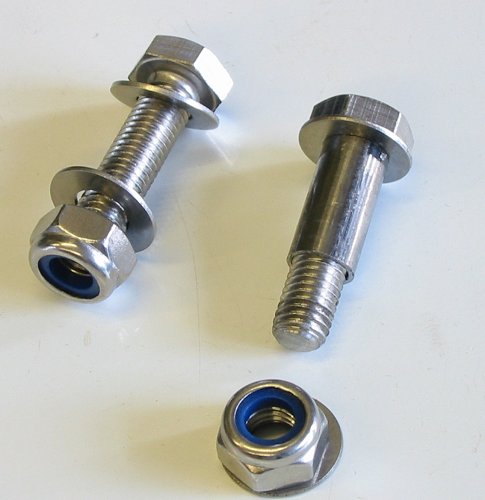
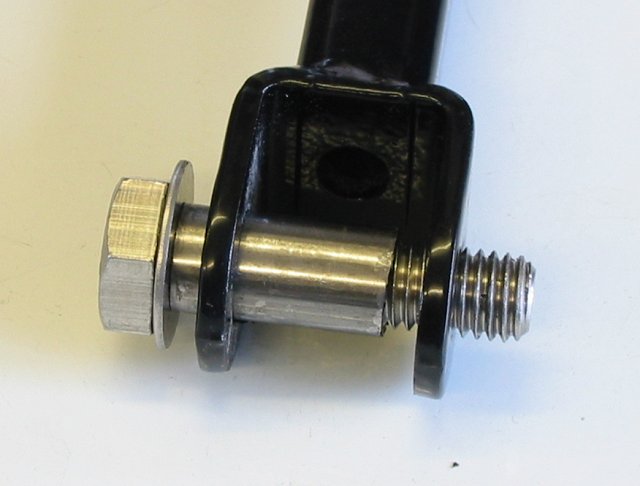
| The bolts in the torque arm are a bit odd. The end that connects to the swing arm has holes of 12mm and 10mm and use a special bolt. I'm using stainless steel items so I had to mess around sleeving part of the 10mm bolt as the photo shows. I'm also using Nylock nuts. |
|
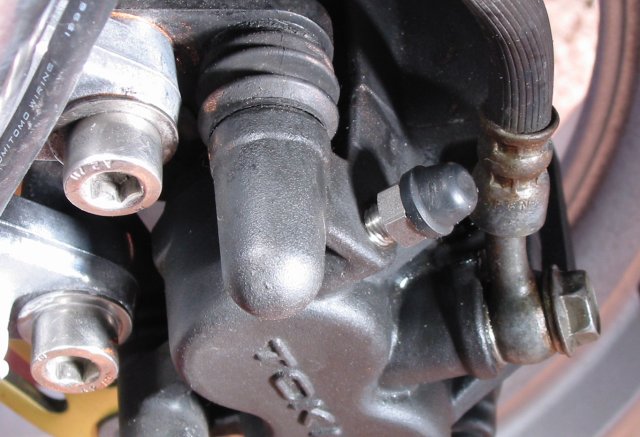
| I sent off for some new stainless steel bleed nipples to replace the rusting items. Sourced from OEM at £7.90 a pair. The brake pipe banjos are not as clean as I'd like, but they'll get replaced at some point |
|
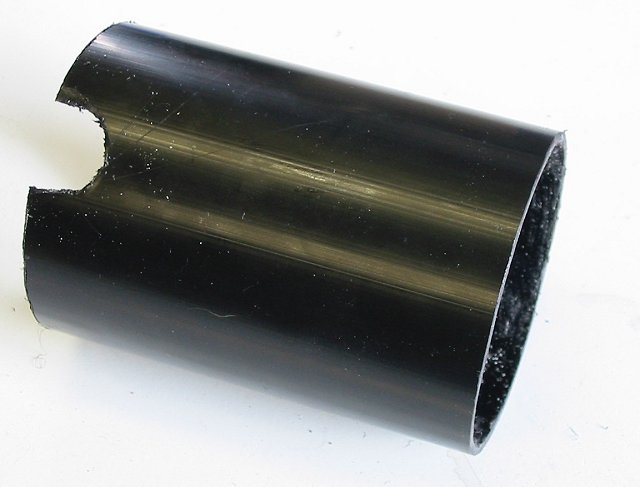
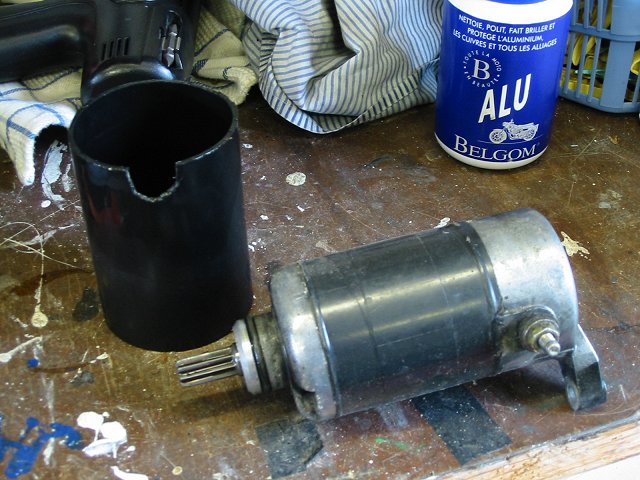
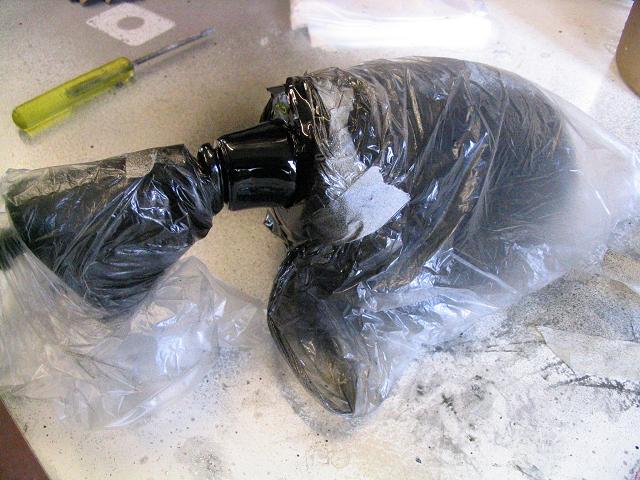
| I've been looking for some black plastic sleeving to slip over the starter motor in order to protect it. The local hardware shop had some black plastic downpipe for guttering. It's outside diameter is 68mm and the inside was 65mm. The starter motor is 63mm. It was only £5 for 2.5m so I got some. I cut a length 95mm long and put in a notch about 15mm by 10mm. This will then cover most of the motor. |
|
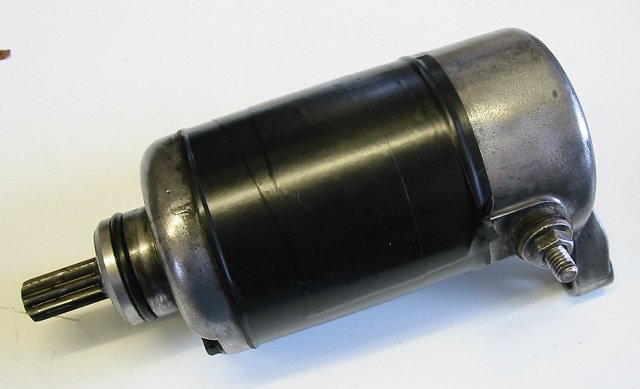
| And it slips over the starter motor thus. It's a nice fit, not loose, but easy to get on and off. The notch goes around the electrical terminal. Sorry about the blurred pic, didn't realise until the motor was back on the bike. |
|
| Here are some shots of the installed solution. My main concern now is heat. I'm not sure how robust this plastic is. I did start the bike this weekend and it got to full operating temp. It seemed to be faring okay with the heat from the exhaust being the main problem. This was stationary in the garage with no cooling affect from air flow. We'll see. |
|
| Next up was a bit of re-spraying. The swingarm end caps had some corrosion and the so did the brake carrier. I saw no point in polishing the carrier as it would be a pig to keep clean once it was back in place. This item was painted black (by Suzuki) on my old GSX, so I decided to paint this one silver. |
|
| On Sunday it was time to start putting things back together, starting with the rear end |
|
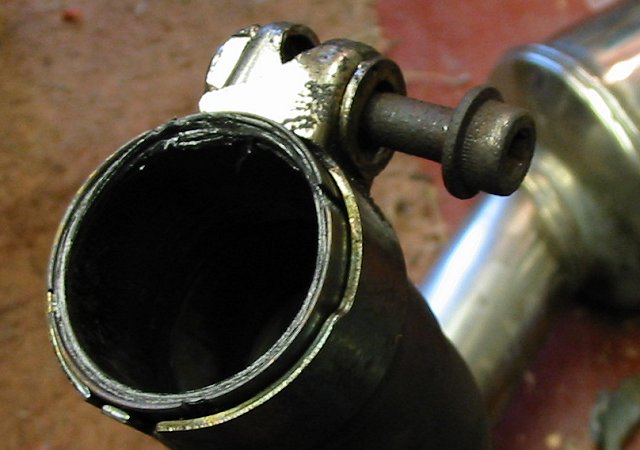
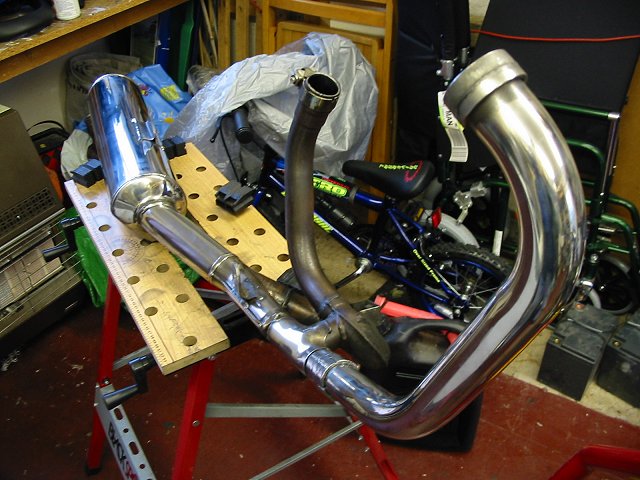
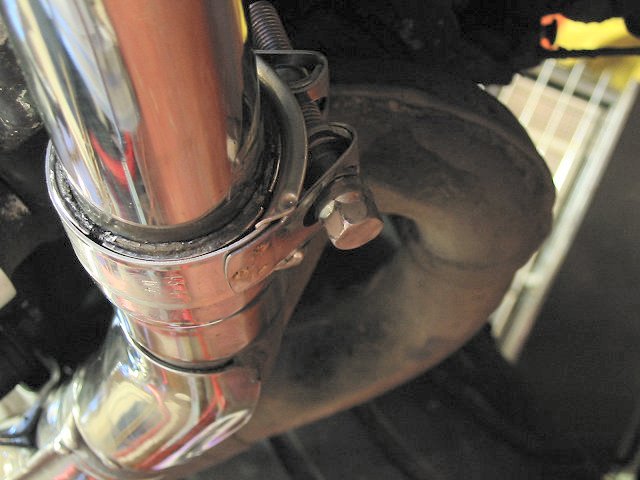
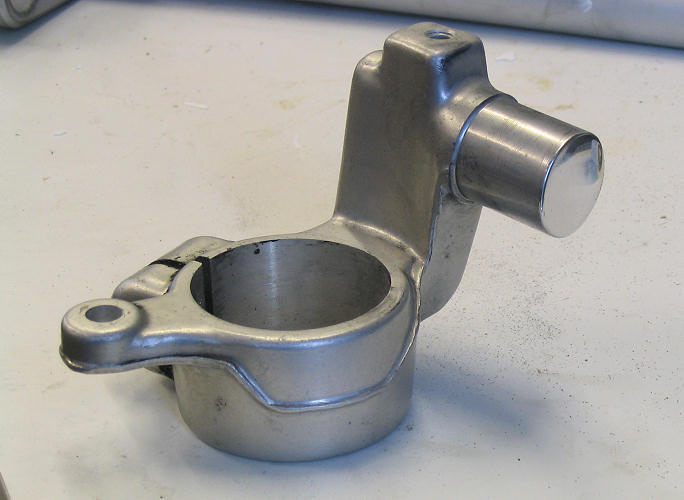
| Next the exhaust. This the Mikalor exhaust clamp in marine grade stainless steel (43-47mm). The clamp was too long to position above the pipe as show in the first pic, so I moved into the position of the original clamp. Next I took the rear footpegs apart because they seize up regularly. |
|
| Finally back together but not finished. There are still lots of areas that need a cleanup, but that's just down to a bit of degreaser and soap and water. I shan't bore you with that. |
|
|
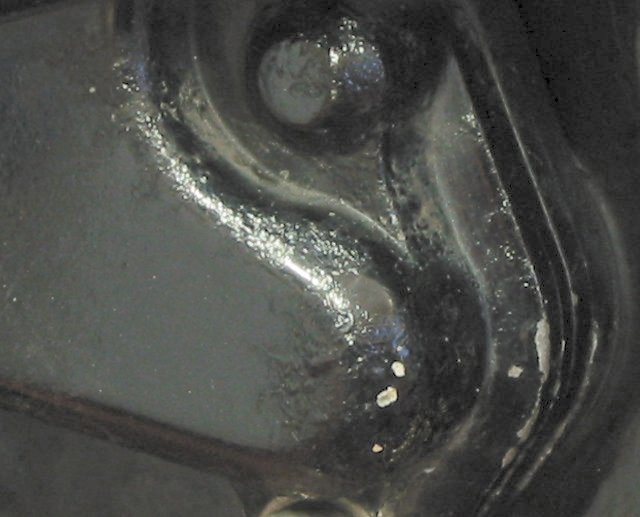
If you think the corrosion story is over,
you'd be wrong. Whilst cleaning the engine I discovered these
blemishes on the right hand side engine cover. I've already had to touch
up the engine because of flaking paint, but this appears to be corrosion
from under the paint in the same manner as the fork legs.
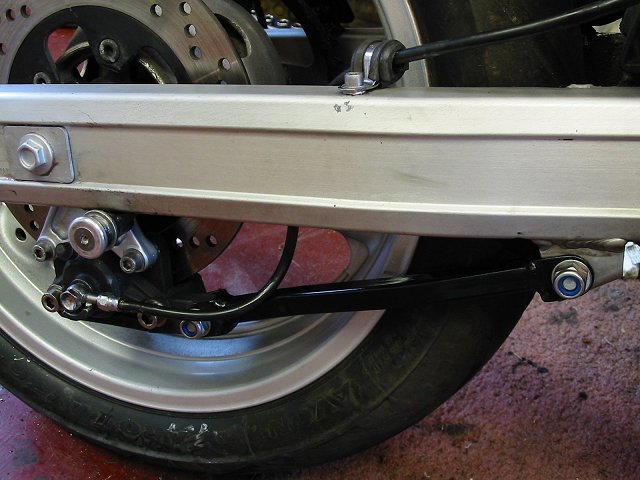
The swing arm also has signs of corrosion. Near the end where the arms meet the end caps (see photos above) and here on the brake hose clamp. The original clamp was slung out a long time ago due to corrosion, this one is stainless. The two lower larger marks were caused by the original clamp which covered over this bit of swing arm. |
|
| Some soap, water and elbow grease. and reluctantly a coat of WD40 at least until winter has receded. |
|
|
One Year Later - 2003
|
|
|
I'm knocking on the door of the big 15k mile service. Time to check the valve clearances, happily they were fine, so the rest of the service was confined to the usual oil change, sparkplugs and general greasing. On top of that the oil pressure switch has stopped working. A new one cost £17.
|
|
|
The paint on the front of the engine was looking grim, lots of bare metal, so a touchup of PJ1 engine paint was required. Last year, as an experiment, I made a cover for the starter motor out of black plastic drainpipe. It slips over the motor and I was worried that all sorts of cr*p might be lodged under it by now, so I thought I would remove it to check for corrosion etc. I needn't have worried it was fine, even the PVC tape looked okay. See for yourself in this photo.
|
|
|
Another experiment was to polish the front forks and leave them bare, just relying on regular polishing to keep them in good nick. This largely worked well until the middle of December, when I covered the bike and hardly used it for a couple of weeks. The level of polish must have been quite low and what with the road salt some corrosion did occur but nothing major and certainly nothing like last years photos. A quick buff with some Belgom Alu and a polishing mop soon brought them back again. A success I think, I'm certainly not tempted to coat them in lacquer again.
|
|
|
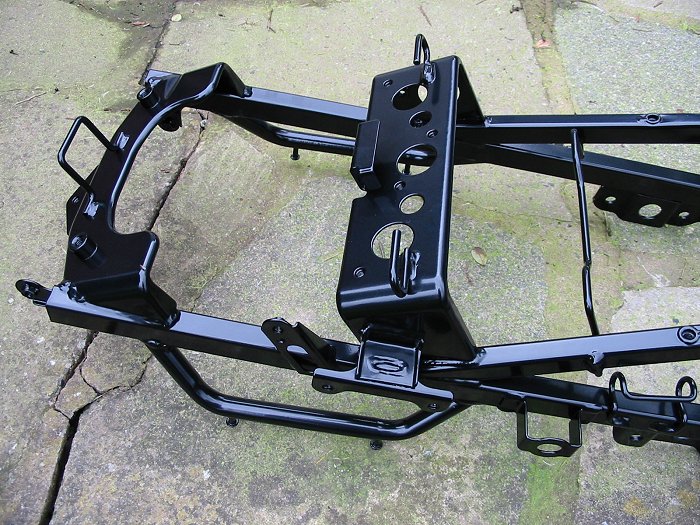
I got the rear brake torque arm powder coated last year and it still looks like new. Looking at the state of the subframe convinced me that a touchup with Hammerite was not the real answer. So I've stripped the frame bare and getting that powder coated too. Should look good. The photo shows the rusty sub frame but the reason I included it was because if you need to get to the rear of the engine its a doddle to remove the two lower subframe screws, unhook the rear brake reservoir and pivot the whole thing up. I even left the battery in.
|
|
|
Just to bring you up to date on the work done since last month; The subframe was returned nicely coated in plastic. It looks like new. One bit of bad news is that the rear brake torque arm that I had powder coated last year was not in perfect condition as reported earlier. Whilst taking the rear brake caliper apart for servicing I noticed a small piece of paint had come off the torque arm. I was a bit pissed. Not sure why the powder coating failed. It could have been rust in the metal prior to coating or that the paint is so thin on the corners of the metal, that it couldn't cope with the ravages of winter. I suspect the latter because it's failed in two places, at both ends where the bolts go through on the lower edge where the metal has a lot of sharp edges.
|
|
|
Bearing this in mind, I'm not going to rely on powder coating alone to stop the rear frame from rusting. I've ordered a hugger from MPS to add a second line of defence.
|
|
|
One of the nice things about running this site is that I get the odd freebie. There was the MCN trip last summer, another was from Chad of Superbrace. He sent me a free brace for mentioning it on the site in December (11th) and adding a link to his site. There were no conditions attached, so it was quite generous of him. The brace is solid aluminium and beautifully polished. Can't say I've had a chance to really test it yet, so I'll let you know how it goes. I'm surprised the SV doesn't have a fork brace as standard, all my past bikes have had them, usually just a mild steel job hidden under the mudguard.
|
|
|
The last job was reassembling the rear end of the bike. Re-fitting the subframe was straight forward except that the powder coating gets in the screw threads and I had to tap a few of them out. A tap and die set is well worth having in the garage. Again I used a lot of stainless screws, especially on the undertray where the original bolts were in a right state.
|
|
|
Whilst putting the body work back together, I thought that I would make a few cosmetic changes. I bought some gold anodised mesh from B&Q and fitted it to the side and front vents of the fairing, very easy to do with a glue gun. I also sprayed the bar end weights silver to match the frame. Hammerite smooth silver is a perfect match for all the silver parts on the SV. The rear footrest hangers also got a touchup.
|
|
|
Another Year Later - 2004
|
|
|
First inspection reveals that there is not a
whole lot to fix this year. I have some jobs lined up that I put off from
the summer and now need attending to. So the first weekend was spent
giving the bike it's 20k mile service. This is not a major service so the
task were fairly straight forward.
|
|
|
First job was to balance the carbs. This
hasn't been once since the bike left the factory. Back in the summer I
bought some vacuum gauges from Tony P, so I had no excuse for not doing
this. I removed the air box, disconnected all the cables and wires from the
carbs and then removed them. I drained the float chambers but did little
else other than give them a good inspection. The choke cable on the rear
carb was slightly corroded on the spring and plunger so it gave that a
clean and gave it a spray of WD40. I removed the rubber cap on the front
vacuum take off point, fitted some rubber tubing and put the carbs back in
place along with all the cables wires and fuel feeds. Started the
bike and let it warm up. I adjusted the damping on the gauges to stop the
needles jumping all over the place and noted that the carbs were well out
of balance. I spent a good ten minute making adjustments until I was happy
that both gauges read the same and would settle back in the same position
after a blip or two on the throttle. Job done.
As the engine was nice and warm, I dropped the oil out of the engine and let it drain. Time for a cuppa. Next I replaced the spark plugs with new items and refilled the engine with fresh oil. Started the engine and gave it the usual blip on the throttle to test response. It did sound a whole lot crisper than before. Next job was to check the headlight adjustment. I've been getting flashed a lot and I think they are a bit high. Last year I decided the raise the dip slightly, I'm desperate to get a better view in the dark. I think I made a dogs breakfast of it. This year I moved the bike to the back of the garage and adjusted each lamp in turn instead of trying to do both at the same time. I lowered the left lamp slightly and then marked the cutoff point on the opposite wall. I then swapped lamps and noted that the right lamp was about a foot above the other, oops. Needless to say it got adjusted. So my tip is to do them one at a time by removing the plug off the back of the lamp.
|
|
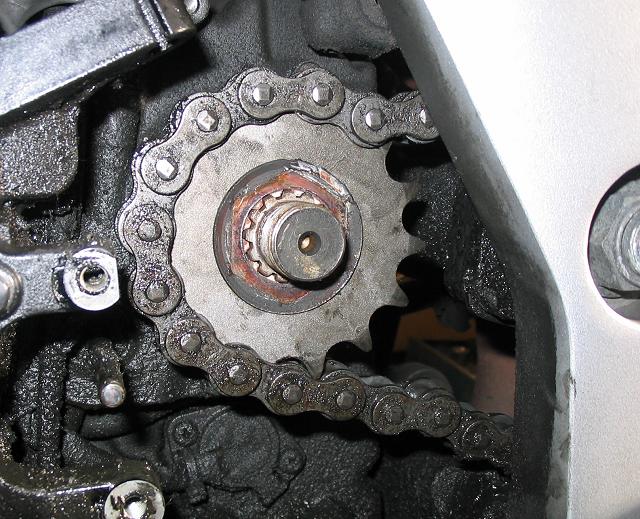
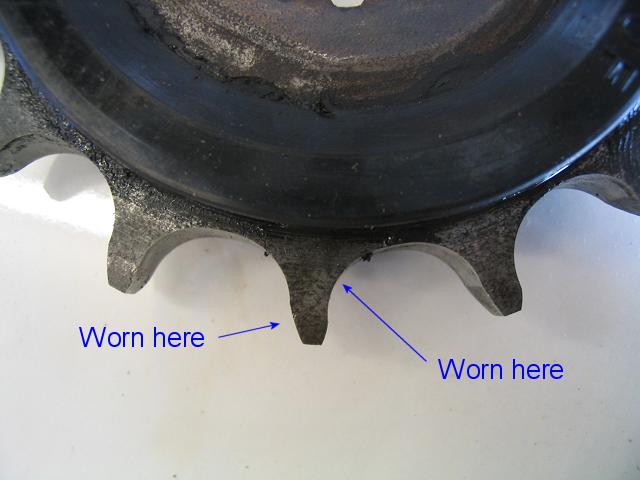
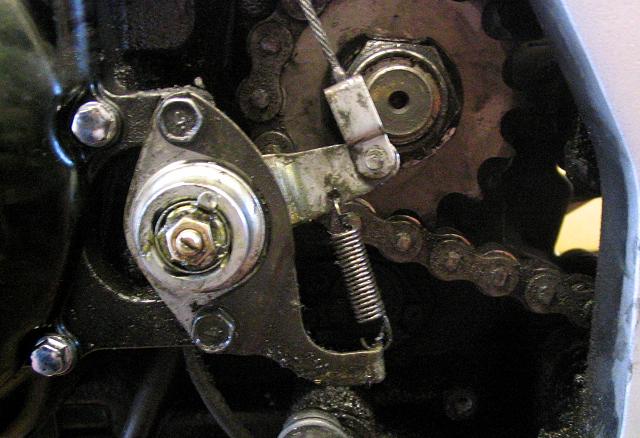
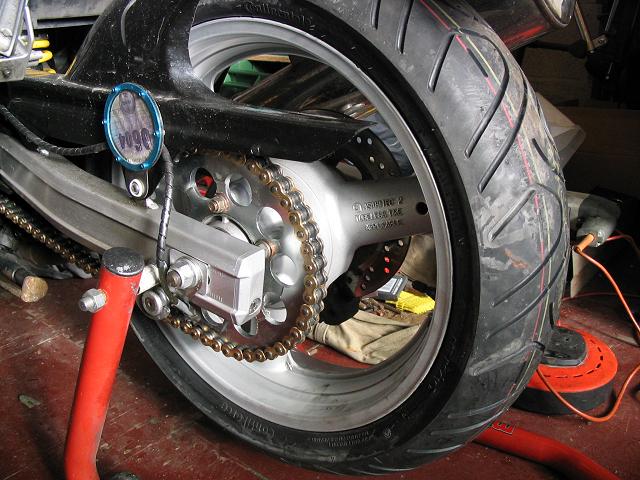
| I'd noticed during the summer that the chain was sounding notchy whilst pushing the bike backwards. This is usually the sign of knackered sprockets. Now thanks to the Scotoiler, the chain has barely moved in 19k miles, most impressive, but a quick look at the rear sprocket confirmed that all was not well. I ordered a new DID chain and sprocket set from MPS. Suzuki use a gearbox sprocket nut with a built in thread lock. My GSX750 had one of these and it was a pig to undo unless the had an air impact hammer. This usually meant a trip to the local bike shop and begging a borrow of said device in return for a drink. The SV also has one of these nuts, but I thought I'd have a go myself first. I took off the sprocket cover and removed the clutch actuator. Lock the back brake by hanging a heavy weight off it and tried to undo the nut (after releasing the locking tab). It came off with barely any effort. Cheers all round. |
|
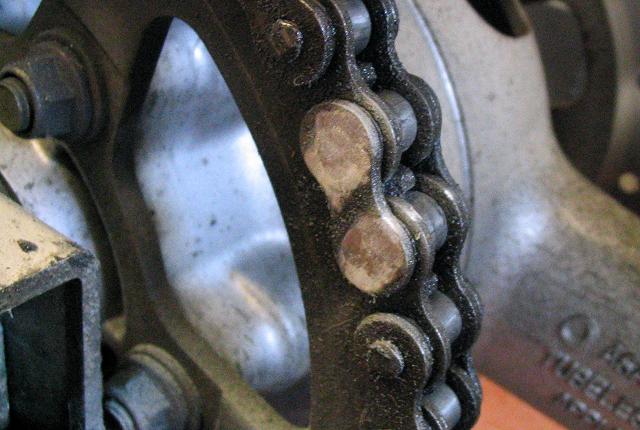
| You can see from this photo how badly worn the gearbox sprocket is |
|
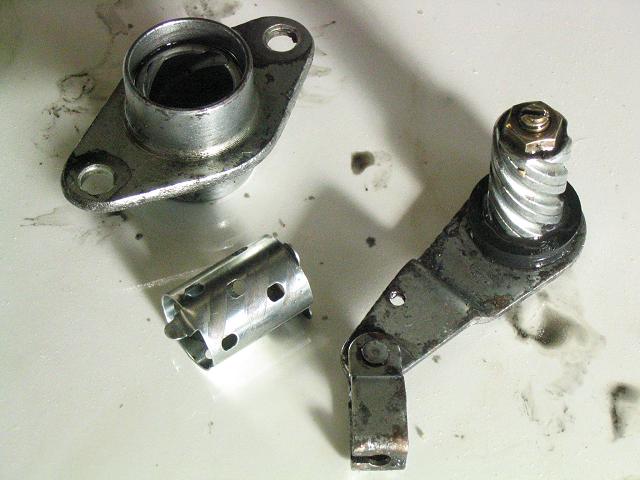
| I removed the clutch release mechanism to get better access to the sprocket. I didn't pay much attention whilst removing it until I heard a small small fall on the garage floor. Beware the the moving part of the mechanism can come out and this in turn reveals 11 small ball bearings that now have nothing to hold them in. I took the opportunity to clear the whole thing up and re-grease it. |
|
| The release mech was then re-attached. |
|
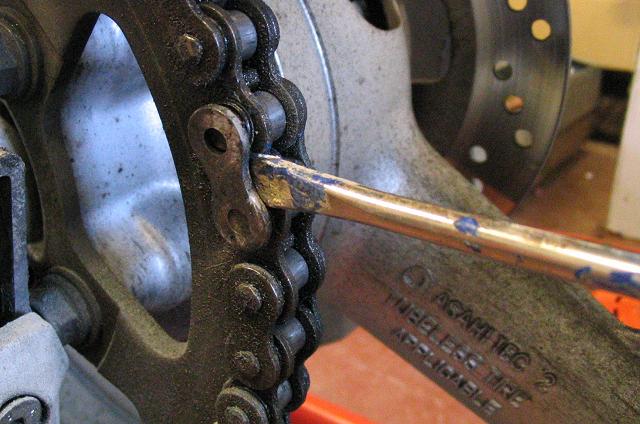
| Next job was to grind the heads off a link on the old chain |
|
| Prise off the link plate and attach the new chain to the old. Pull the old chain off and use that to pull the new one into place. |
|
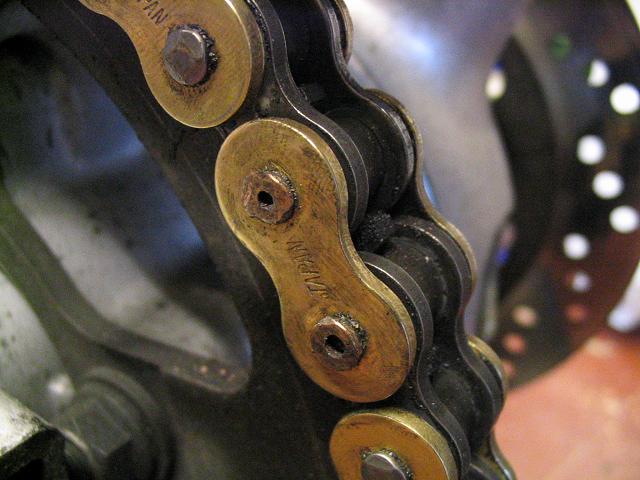
| The softlink is attached and the rivets hammered over so the plate can't come off. I hold a club hammer on the inside and hit the outside with a ballpane hammer. |
|
| Next job fit new springs. This was a straight forward job, if you think that remove the whole frontend of the bike is straight forward. Oil was replaced with 10wt and the standard air gap. |
|
| Front forks weren't as shiny as I would like but there was no corrosion, which is okay considering there is nothing on them. A quick polish would soon sort them. Brake calipers got a good clean and re-grease too. |
|
| Every year I disconnect the wiring connectors inside the fairing and every year I get a puddle of water on the floor. The water seems to collect in the outer sheath of the loom. |
|
| Some of the rear wheel bits were looking shabby, so a good clean and a few coats of smooth Hammerite silver soon sorted them. |
|
| Everything back together including a nice new tyre! Rear brake caliper got an overhaul too. |
|
| The pinch bolts on the front forks were looking grubby and corroded, so I stuck them in a jar of vinegar overnight. You don't get a shiny finish but they come out a lot cleaner. |
|
| I tore a dust seal on one fork leg whilst polishing, so I had to buy some more. These took a week to arrive and were the only hold up to re-assembling the bike. The dust seals were fitted and the bike rolled out the garage ready for a shake down run. No problems to report. |
|
| I started to put the bodywork back on and got as far as the mirrors and noticed the state of them. Time to get the Hammerite out again, only this time smooth gloss black. |
|
| Looks a lot better now, just needs time to cure. The side stand got a coating too. |
|
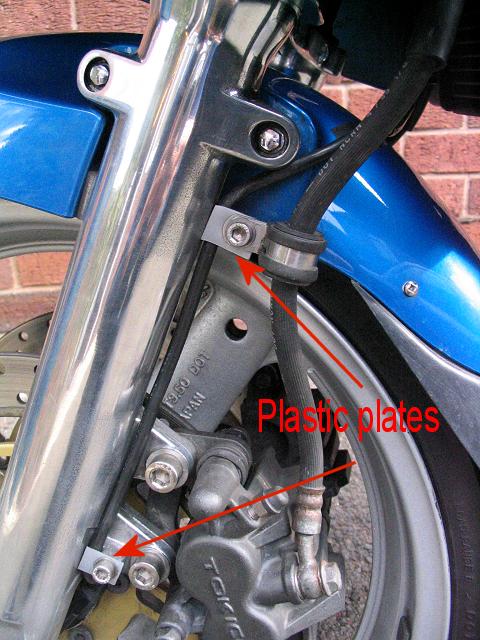
| Another annoyance is the little plates that hold the speedo cable in place, every year they rust. This year I made plastic replacements out of the silver plastic cap from the Hammerite spray can, they match the forks and won't corrode. |
|
|
That's about it for this year. It taken a lot of
time and effort with weekends locked in a cold garage, but I'd rather do it
now than in June. John
|
|
|
And Now 2005 - Don't the years fly by!
|
|
|
It took me a while to get going this year on my
annual service and cleanup. I didn't clock so many miles this year and I
stopped using the bike before the roads got really salty. In fact the
weather was quite mild until we got to late Feb. |
|
|
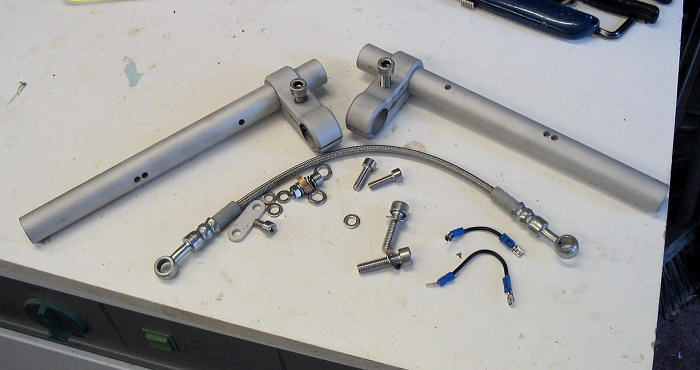
As the bike was 6 years old this year, I decided
that it was probably time to replace the brake hoses. The brakes had lost
their bite a bit and whilst new pads helped, I knew that the hoses were
probably getting too flexy. So an order for brakes lines was the first task.
It then occurred to me that if I was going to all this trouble, now would be
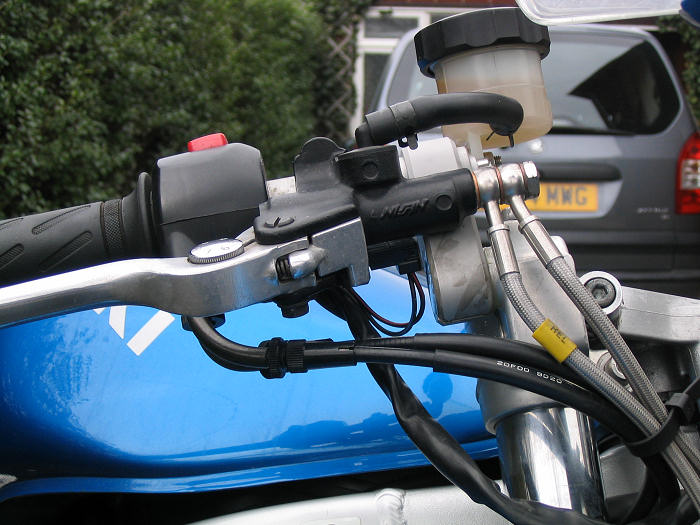
a good time to fit handlebar risers of some sort. The risers would require
longer brake lines, so it made sense to combine the tasks. An order was
despatched to HEL and Sunrisers. I chose Sunrisers as the design appealed to
me, there was less compromise when it came to fairing/screen clearance plus
they were a reasonable price around £100 after currency conversion. |
|
|
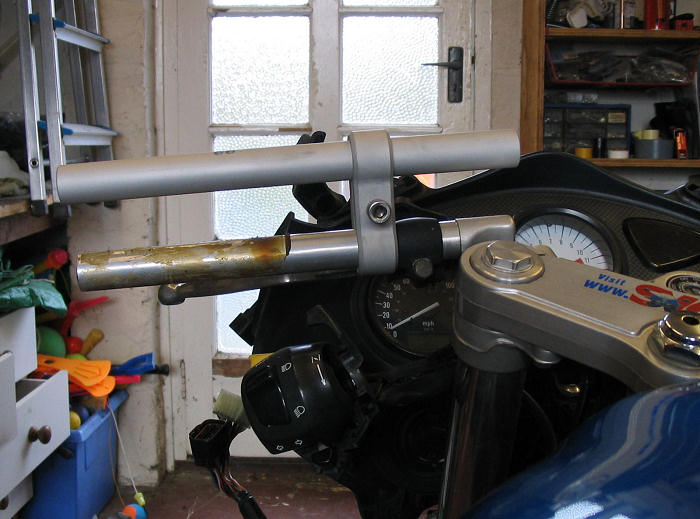
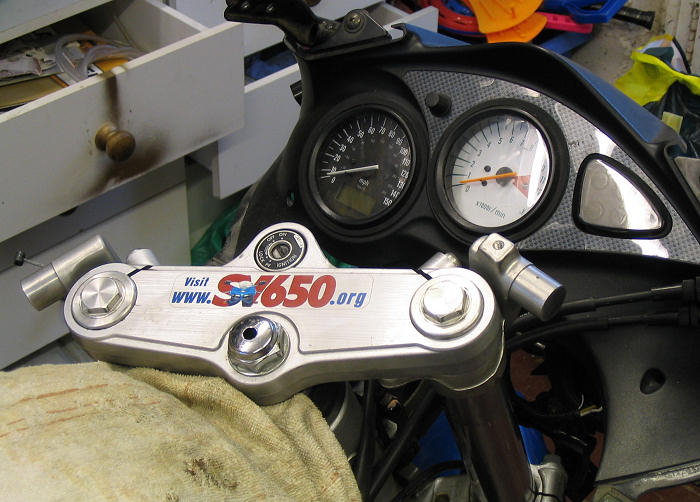
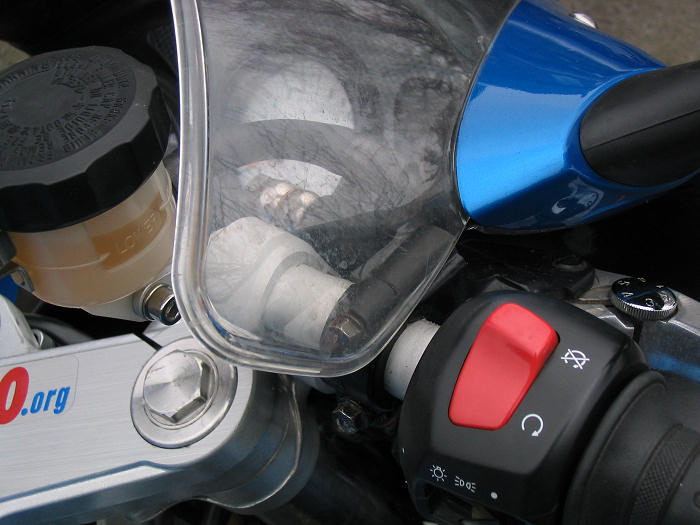
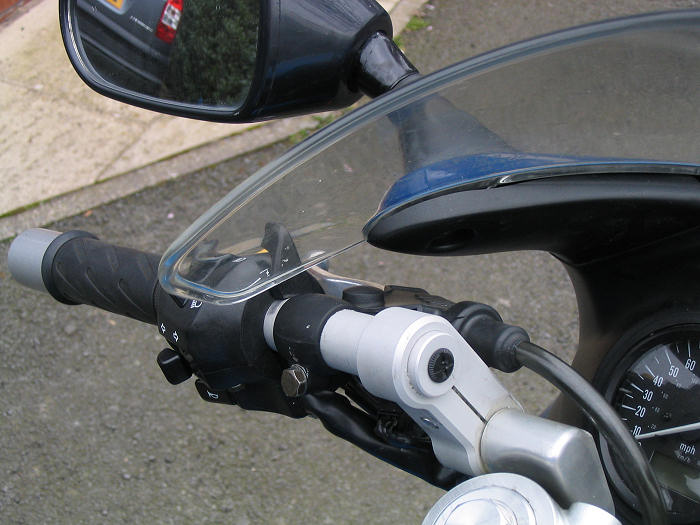
Work begins. The bike was stripped of all its
bodywork and the handlebar fittings all removed. This gave me a chance to
slip on the Sunrisers and compare feel and fit. I also took the photos here
to give you some idea of the extra height. |
|
|
I played around with cables and wiring to check
for length and play. I decided to move the wiring out of the supporting
metal loop to give a little extra slack. I took off the top yoke and removed
the ignition barrel this allowed the loop to be slipped out. The ignition
barrel has security screws, basically a torq bolt with a pin in the middle,
luckily I had a such a bit. I then took off the existing handle bars. |
|
|
I used the Sunriser clamp to mark the cutting
point on the old bars. I then took out the hacksaw!!!!. Once trimmed off I
sanded and then polished the sawn ends. The bars were then placed back on
the forks and the top yoke replaced .I replaced the small location bolts for
the old handlebars back into position. This bolt stops the handle bars
rotating around the forkleg by screwing into the underside of the top yoke.
This would help locate the bars in the right position, both left and right. |
|
|
The new bars have location holes in them for the
handle bar fittings, such as the switch gear, and they have to be inserted
into the clamp the right way around. A bit of experimentation soon had then
on the right way round and all the handle bar fittings back in place. The
master cylinder for the front brake was already disconnected from the hoses
and this made life a bit easier. |
|
|
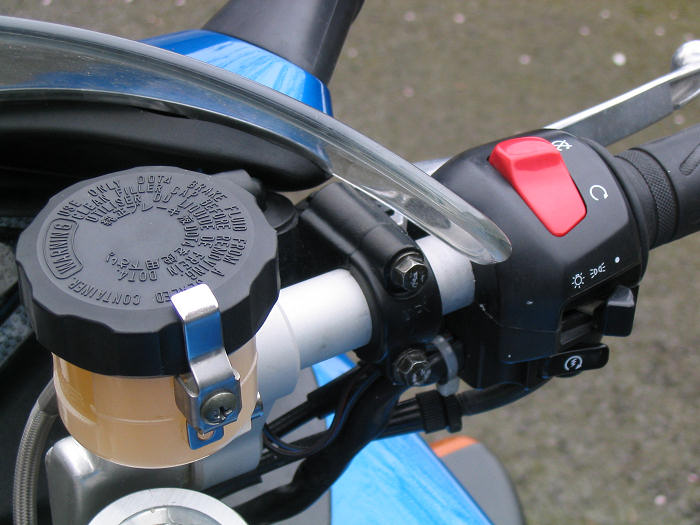
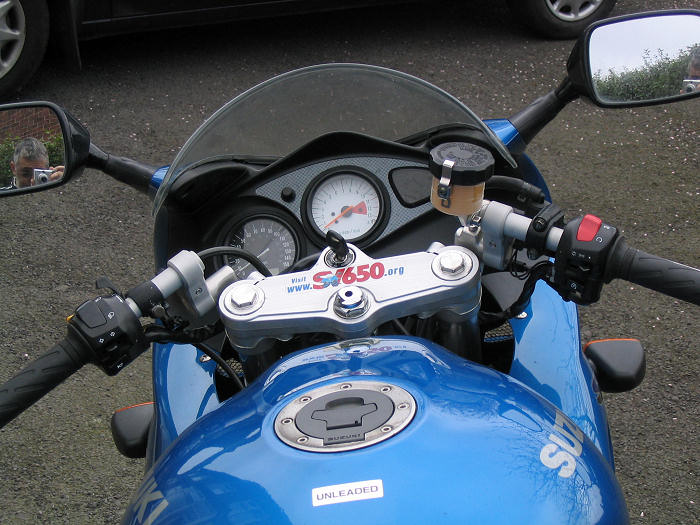
I managed to get everything into the right
position including the brake reservoir which uses a new bracket supplied
with the kit. I was determined to have the bars as high as possible and also
to slightly recline them towards the rider. The recline is also recommended
on the Sunriser site. I had to re-route the choke cable to the outside of
the LH fork leg but everything else went back where it came from with little
fuss. With all bolts done up slightly loose I attached the fairing panels
and started assessing clearances. To get full clearance I had to pull the
bars outwards through the clamps. All this can take a while to get
everything in just the right position. The positions of the bars and clamps
in relation to each other was then marked in pencil. Off with the fairing
again. |
|
|
I tightened all the nuts and bolts and checked
the new bars for rotation around the stumps of the old handle bars. I could
not move the bars whilst in a sitting position, but I could if I stood
beside the bike and applied force with both hands using the clamp as
leverage. Not so good. In normal riding circumstance this would be unlikely
to happen but I didn't want any movement. I knew this might be a problem, as
the Sunriser site mentions the way that the old bars are machined, they're
not smooth, they have ridges running in parallel around the bar. The site
suggests using an epoxy glue as a secondary fixing, so out came the
Araldite. This is why I marked the positions earlier. The clamps were
removed and glue applied. Clamps placed back and everything tightened up.
The fairing was re-attached a small adjustments made. I then left it for 24
hours. Meantime I looked around for other jobs to do |
|
|
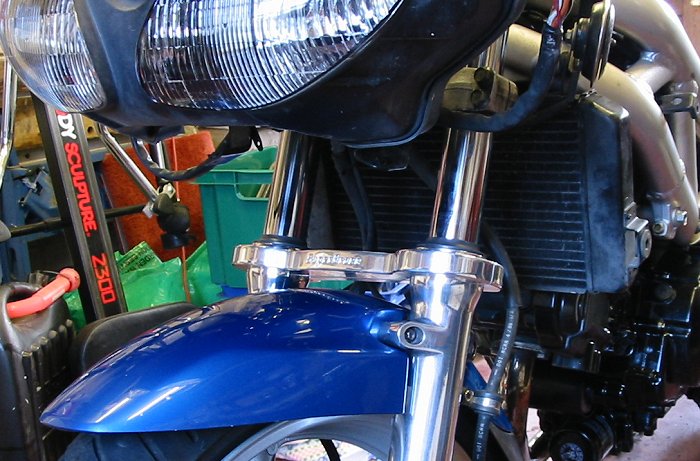
As mentioned in previous years my forks are bare
metal. Regular use of Belgom Alu keeps the corrosion at bay. So a quick
re-polish and they were nice and shiny again. There is some paint flaking on
the engine . Can't do much about this at the moment as the engine is too
dirty to paint. I'll wait until the bike has had a thorough wash and touch
up with PJ1 engine paint. Apart from that the battery needed a charge and I
did some cleaning of parts that are usually coved by bodywork.
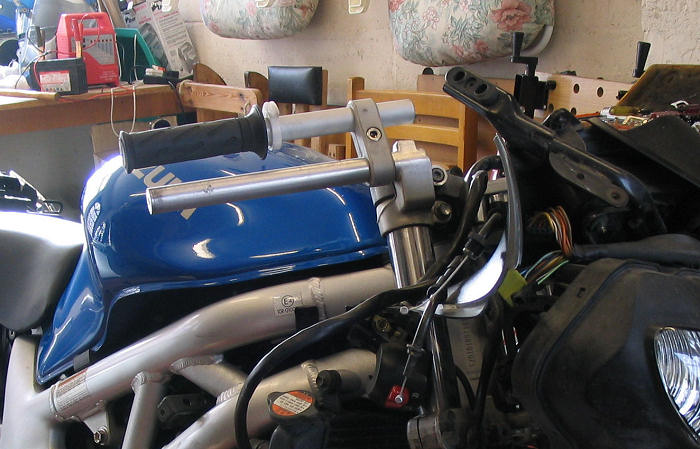
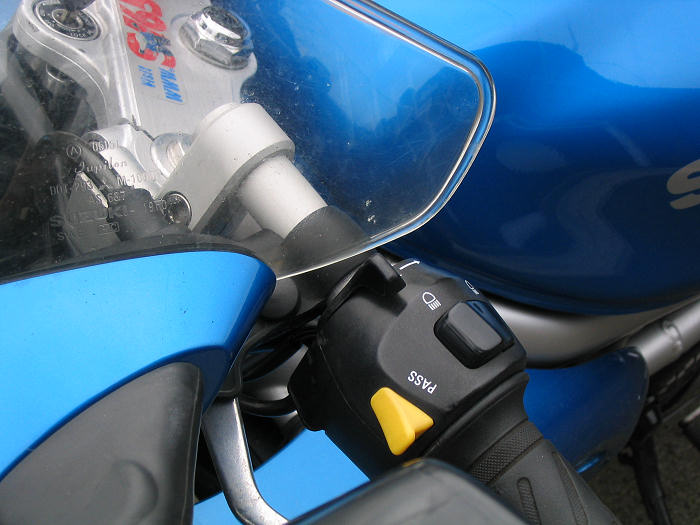
These photos show the right hand clearances on
full lock |
|
|
Next day I tried the force test again on the
handle bars and all appeared rock solid. I then fitted the longer HEL brake
lines. I went for a two line solution in stainless steel instead of the
standard three line. This meant I could dump the splitter under the bottom
yolk. I spent a while finding the best way to route the cable to stop them
rubbing against other items. It took an age to bleed the lines and I stopped
when the lever felt nice and hard I also fitted a new HEL line to the rear
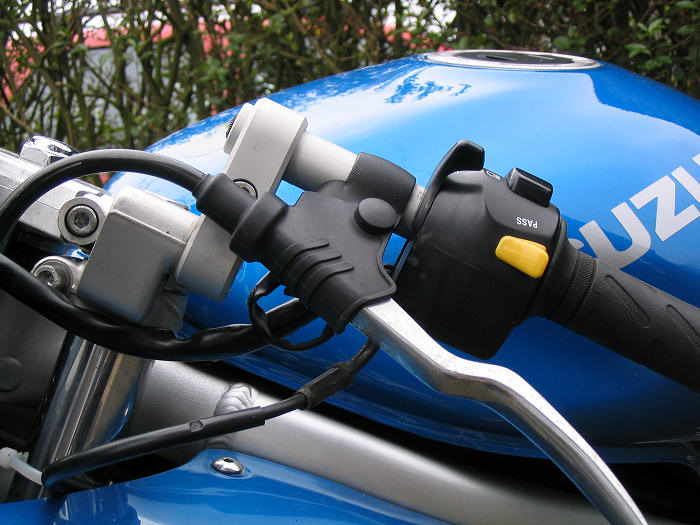
brake as well. These photos show the
left hand clearances on full lock |
|
|
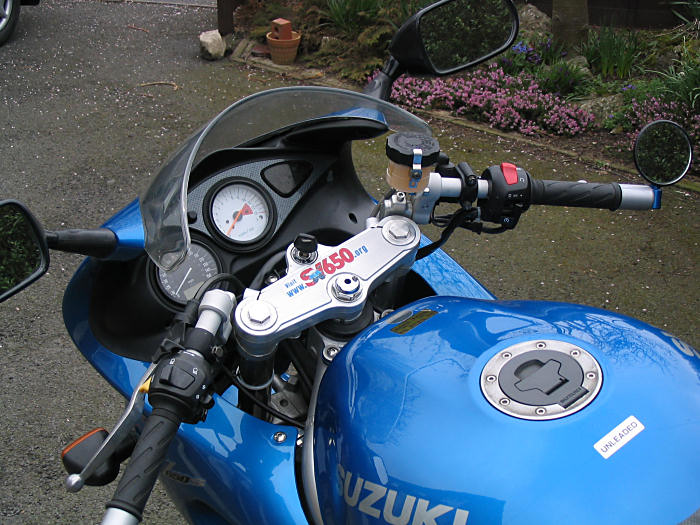
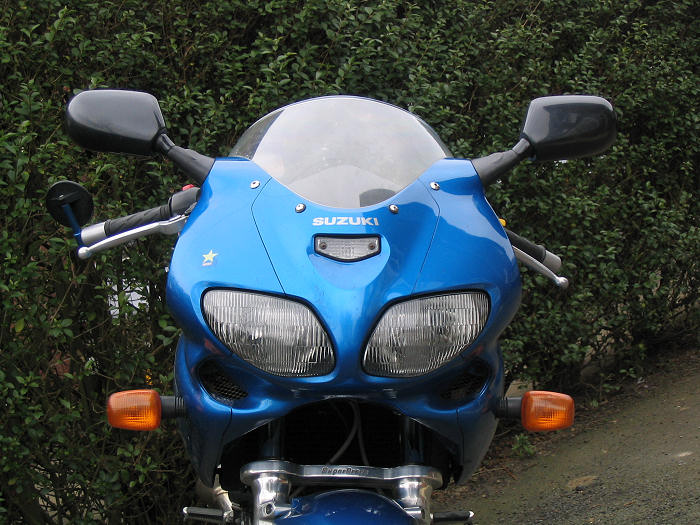
Time to test. The bike doesn't look much
different. You could easily walk by and not notice the higher bars. Even
sitting on the bike with the engine running seemed little different until I
moved off. Straight away it felt more like a tourer, more relaxed. The bars
are now wider and less input is needed when turning. it felt like I had
speedway bars fitted. Slow speed manoeuvring is much easier, especially on
full lock. The second thing that struck me was the brakes...argh....so
wooden. I put my hand on the brake disks at the end of the test, one was
warm the other stone cold. I had run out of time now and any fixes would
have to wait until next weekend. |
|
|
The following weekend I bleed the brakes again.
I can't say I noticed any air leave the system but this hopefully would do
the trick. Time for another test run, a longer one. Brakes, all the feel had
come back, nice progressive action, good, relieved. I took the bike out on a
mixture of road types to see what the differences I could spot. I quick
blast along a dual carriage at 90+ was fine. I was getting more wind blast
on the tops of my shoulders as you would expect. Sliding back on the seat
was a simple cure and much easier than I could do it before. Buzzing down
some quick twisty A roads was just as much fun as before, the extra leverage
from the wider bars makes the steering lighter but nothing to worry about. I
performed a couple of emergency stops from 90+ and the brakes did a good
job, pushing the nose of the bike straight into the ground and shedding
speed very abruptly. I could have applied a lot more pressure to the brakes
but it felt like anything more and the tyre would have either slid or I'd
have been launched over the bars. |
|
|
So was it worthwhile? I think so. The bars still
incline you forwards but with less weight on your wrists. If I want to lower
them back to the original position I still can. I'd prefer them not to be so
wide, but I'll get used to that, if not, I could slide the bars inwards but
that would mean lowering them so that the fairing is cleared. It'll be
interesting to see what the MOT tester thinks of them in July, but I guess
he'll give them a test yank and as long as they don't move. My only nit pick
is that although the finish on the alloy of the bars looks really nice, but
it's a bugger for picking up dirt and grease because of it's rough
sandblasted texture. |
|
|
Disaster July 2005
|
|
|
June 25th 2005. Planned to attend the Red Lion
run but both tyres were bald plus the MOT was due, so I took the decision to
remove both wheels at the same time and head off to the tyre shop. I left
the bike in my drive with clear instructions to my Mrs to keep people away
from it (inc her). So why did I get a call from a distraught wife at
3pm telling me she'd knocked it over? One of life's little jokes I
guess. I thought the damage was mainly cosmetic but it seems the
starter clutch has shed some teeth and I don't know why. There's already a
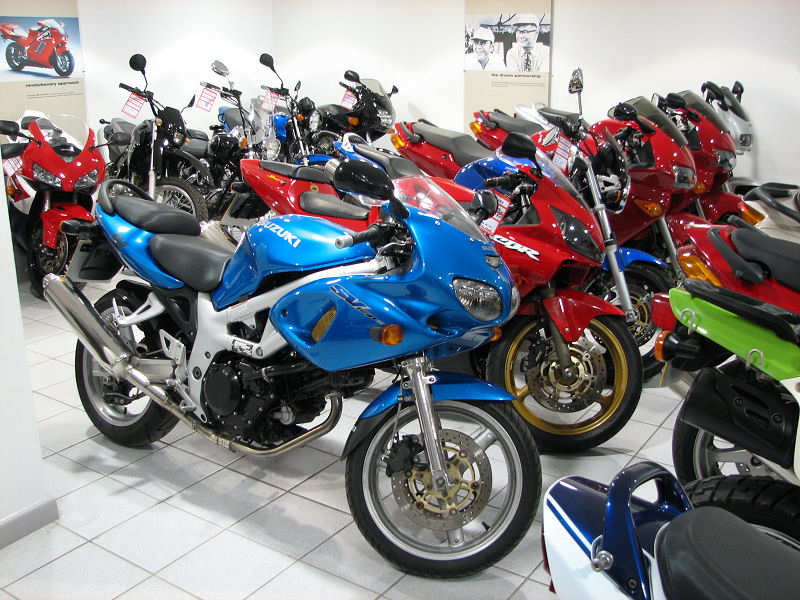
thread on the forum if you want to know more. Once it's fixed I'm going to
start looking around for a new steed. I love my SV but it's starting to look
long in the tooth and this incident hasn't helped. I don't have anything
particular in mind, I'll just keep an eye out and see what turns up.
So I'm going to be bikeless for a few weeks until the new parts turn up. This is very frustrating, as the weather is reasonable at the moment and going to work in the car just goes against the grain.
|
|
|
One month later So, why's it taken this long to sort out? The bike had further to fall because of the lack of wheels and a fair amount of damage was done to the left hand side. Getting the bike upright was a problem, so I attached the wheels whilst it was on it's side and then heaved it up. I then noticed a fair amount of oil on the floor. The sump oil had travelled up the breather pipe into the air box and also filled the front carb.
|
|
|
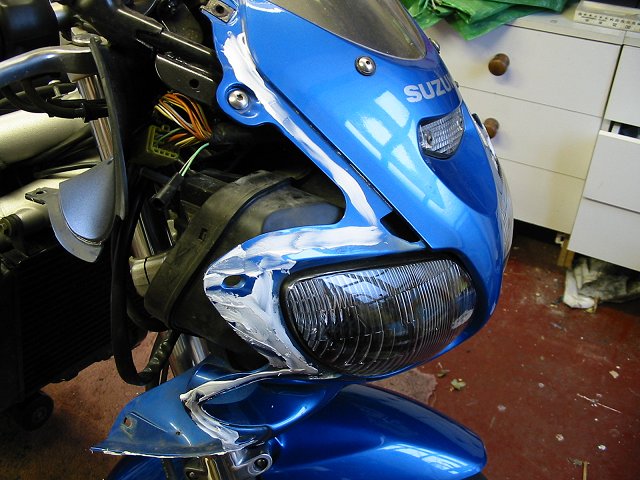
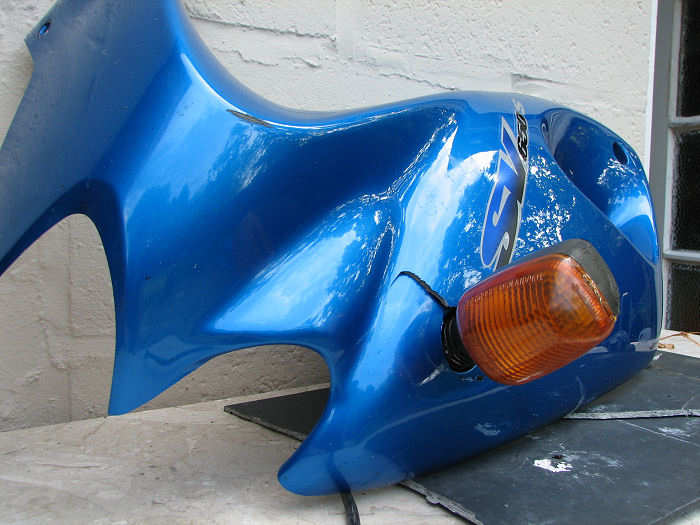
Broken parts so far include the fairing panel,
wing mirror, left Sunriser bar and clutch lever. A new fairing panel was
sourced on Ebay and a quick email to Johan and Peter at Sunrisers soon had a
new clamp on it's way to the UK. Next job was to remove the oil from the
front carb. It's not a good idea to try and start an engine that has fluids
above the piston. Oil does not compress and there is the possibility of
damage if you try. I removed the air box and then squirted some petrol into
the front carb to try and dilute the oil. I reasoned that this may help
clear some of the small airways such as the choke system. I then removed the
front spark plug and turned the engine over by hand. A nice cascade of oil
and petrol shot out of the cylinder head over the rad and down the front
mudguard. I then did the same using the electric starter after removing the
rear HT lead. The engine spun happily and vomited more oil. I carried on
until nothing more appeared. Spark plugs where then replaced along with HT
leads and I attempted to start the engine. Lot's of loud bangs and coughs
but the engine burst into life. The amount of smoke coming from the engine
must have looked impressive from many miles away, not sure my neighbours
appreciated it though.
|
|
|
I gave it a rest and came back later that day.
Another engine start and this time the unmistakable sound of metal banging
against metal. Oh dear. The sound only occurred when the bike started and
again when it stopped. I reasoned it must have something to do with the
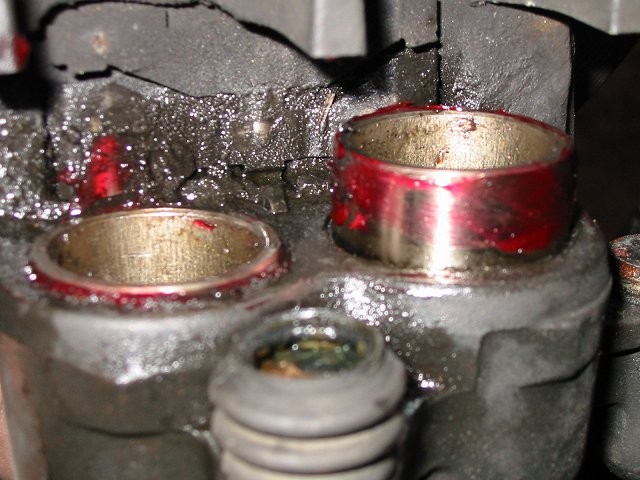
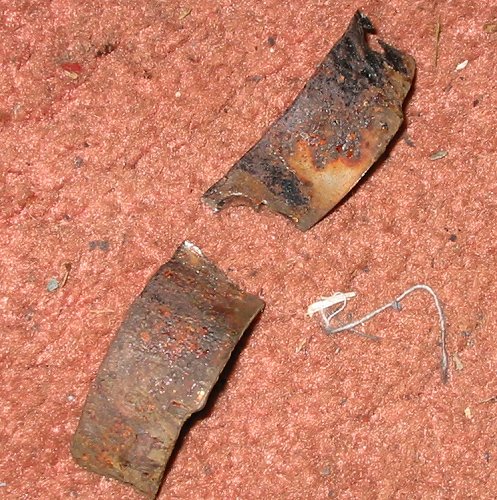
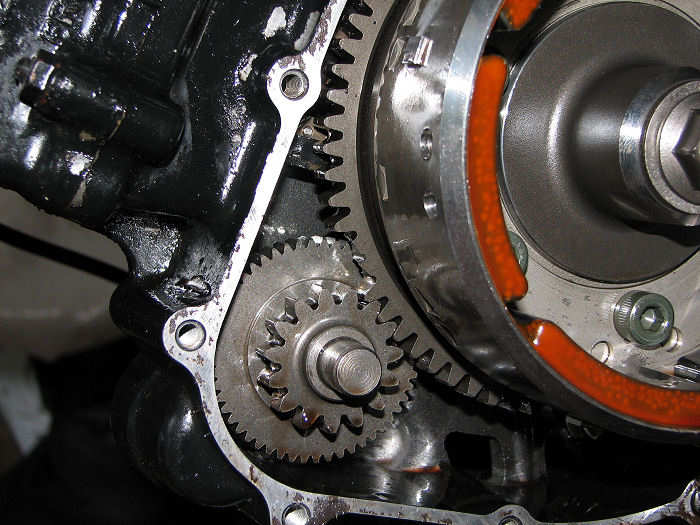
starter motor. I took off the alternator cover and found this. Two teeth
missing off the starter clutch. I can only conclude that this happened
whilst starting the bike for the first time. It's very surprising given the
amount of care I took. Sid Squid made the comment that the starter motor
wouldn't have had the power to do this even if the front cylinder had been
full of oil. So I can only assume that the backfire I heard earlier tried to
kick back against the starter motor as the engine started. I gave up at this
point and went off to order a new clutch and idler cog. I should mention
that I found the two missing teeth thankfully.
|
|
|
A new starter clutch, alternator gasket, clutch
lever and an air filter cost £250. Ouch. I need a special puller to get at
the clutch and it seemed pointless buying one. So I arranged for the Honda
centre to fit the bits, flush out the engine and inspect it for any more
damage. This is where the delay came in. All the parts turned up within a
week except the idler gear. Two weeks later and it still wasn't in. Honda
chased it for me and it turns out that the warehouse swears blind that
they'd already sent it. It arrived the next day.
Honda centre did the job and mentioned that they too had a small mushroom cloud of dense smoke to contend with but gave the SV a clean bill of health. I paid the bill (another £130) and rode the bike home. The ride home was interesting. I forgot that I had two brand new tyres and I was soon reminded at the next turn when the bike fell into the bend like I was riding on ice. I drove home very carefully after that. Good news is that the engine feels fine and may even be better than before (new air filter). I checked the tyre pressures when I got home, 40+ psi in the front and 46+psi in the back, no wonder it handled like a pig on roller skates. So next job is to get it back to the shop for an MOT. As the shop is right next to my work place, this can wait until I get back to work tomorrow. The total repair bill so far is £430. I still have to replace or repaint the left hand seat cowling and get a new wing mirror. The indicators are a bit scratched, but I may be able to polish out the worst of it. It's been an emotional and frustrating month and of course now that the bike is back on the road the weather has gone sour. Tip of the month. If you ever need to remove both wheels off your bike, do it in the garage, lock the doors and hide the keys. Simply asking someone to not go near it, doesn't seem to work.
|
|
|
|
|
| I sold this bike in the spring of 2006 to a lad in Ellesmere. Had the odd phone call from him about this as that for a couple of weeks and didn't expect to see my baby again.....until it urned up the Shrewsbury Honda centre in January of 2007. She still looks great and has only covered a further thousand miles. End of the story, probably not..at least I hope not. |
|


